

Stop the service
Preferably, update your server at a day/time where you're sure nobody will connect.If this is not possible, it's strongly advised to:
- Notify the users of an interruption of service
- Stop the database server
Notify the users of an interruption of service
The first thing to do to avoid loosing some data is to ask all the users to save their data and close their XStudio instances and wait until the update procedure is completed.Stop the database server
When all the users have saved their data and closed their instances, stop the Database Server service.This will ensure that nobody can connect anymore.
Please refer to your Database Server's documentation about how to stop the service.
Please click on the appropriate options below:
It consists in running the command:
service mysqld stop (CentOS, RHEL, Fedora) or service mysql stop) (Ubuntu, Debian) or mysql-server stop (FreeBSD)
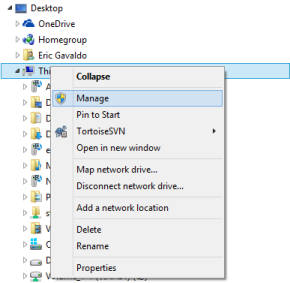
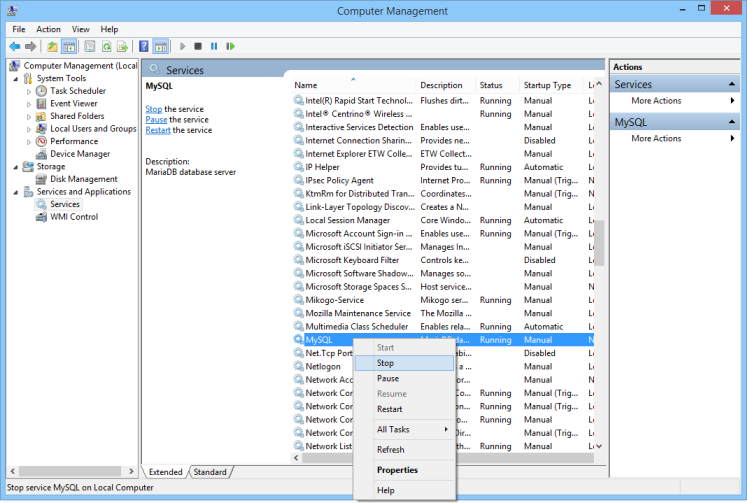
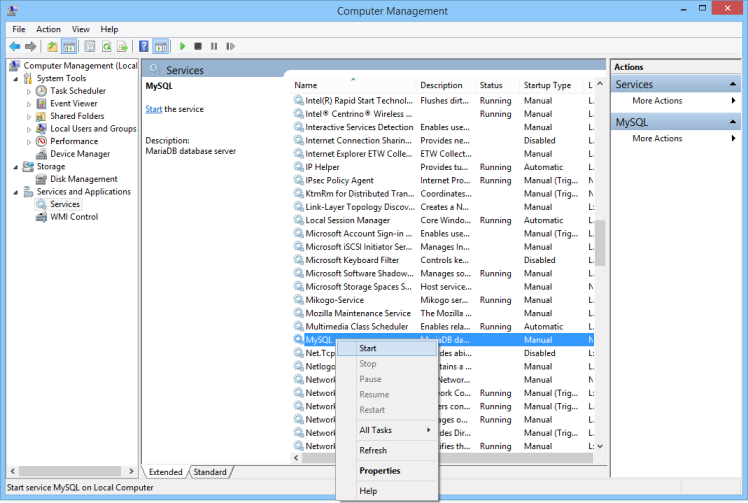
It consists in stopping the service from there: This PC > Right-click > Manage > Services and Applications > Services
Backup your data
The database
Please refer to your Database Server guide for more information or check out the Backup/Restore section of the documentation.Your custom launchers
If you developed some custom launchers using the SDK, it's advised to backup all your source files, build scripts, binaries etc. before updating.You can find all your launcher binaries in:
- the
/var/www/xstudio/bin/launchers/ folder if your current version of XStudio is <=3.0.- the
/var/lib/tomcat8/webapps/xqual/xstudio/launchers/ folder if your current version of XStudio is >=3.1.Your custom reports
If you developed some custom XSLT reports, it's advised to backup all these XSLT (along with their associated resources i.e. images etc.) before updating.You can find all your custom XSLT reports in:
- the
/var/www/xstudio/export.zip file if your current version of XStudio is <=3.0.- the
/var/lib/tomcat8/webapps/xqual/export.zip file if your current version of XStudio is >=3.1.so just backup this file.
Your visuals
If you customized your server with custom splash screens, logo and icons, it's advised to backup all these resources before updating. You can find all your visuals in:- the
/var/www/xstudio/visuals/ folder if your current version of XStudio is <=3.0.- the
/var/lib/tomcat8/webapps/xqual/visuals/ folder if your current version of XStudio is >=3.1.Update the server
IMPORTANT: If you're updating from XStudio version <=3.0 to a version >=3.1, you must first:
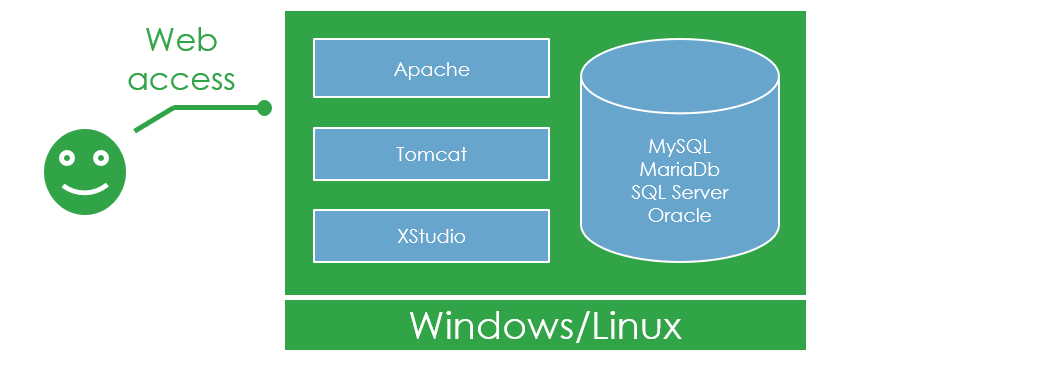
A standard web server (i.e. Apache httpd is is not enough anymore).
Once this is done, please continue following the instruction below...
- Install a servlet container (procedure detailed here)
- If you installed your servlet container on a Linux server, create an
xqualempty folder in/var/lib/tomcat8/webapps/(only lowercase characters) - If you installed your servlet container on a Windows server, create an
xqualempty folder inC:\Program Files (x86)\Apache Software Fundation\Apache2.2\Tomcat 8.0\webapps\(only lowercase characters) - Uninstall you current web server (or just delete the folder where XStudio was previously hosted in it - i.e.
/var/www/xstudio).
Note: This does not erase any data as all your data are in the database.
A standard web server (i.e. Apache httpd is is not enough anymore).
Once this is done, please continue following the instruction below...
Please click on the appropriate options below:
You just have to save the original configuration files, unzip the
xstudio_v<version>_web_package.zip, overwrite the existing install and restore your configuration files.- Connect to the server as root via WinSCP (or any other similar tool)
- Backup all the
*.conf,*.jnlp,*.php(if any) and*.jsp(if any) files from the existing XStudio install.
You can find all these files in:
- the/var/www/xstudio/binfolder if your current version of XStudio is <=3.0.
- the/var/lib/tomcat8/webapps/xqual/xstudiofolders if your current version of XStudio is >=3.1.
- Backup the
*.conffiles from the existing REST API server if any
If you can't find them, then please first configure the REST API server.
You can find all these files in:
- the/var/lib/tomcat8/webapps/xqualfolder if your current version of XStudio is >=3.1.
- Download the version of the XStudio Web Server package you wish to update to (from our download section)
- Upload the zip file you downloaded (i.e.
xstudio_v12sp1_web_package.zip) in the/var/lib/tomcat8/webapps/xqual/folder of the server (which is now empty)
(with WinSCP, just drag and drop the file in the right panel)
- Unzip the zip file on the server
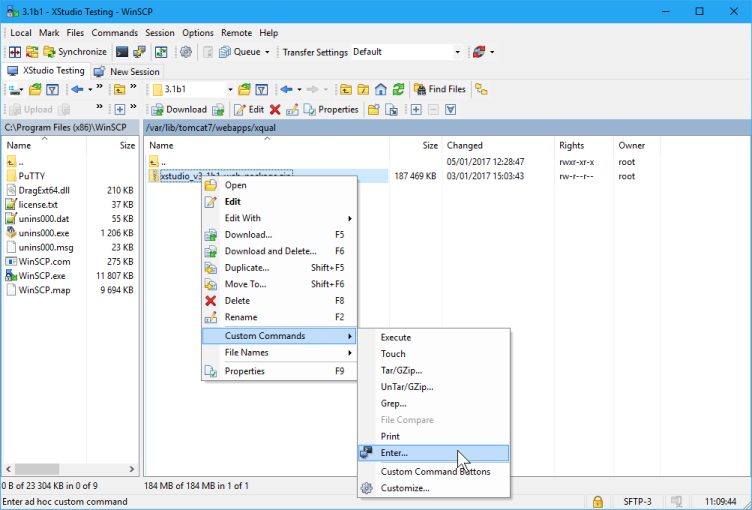
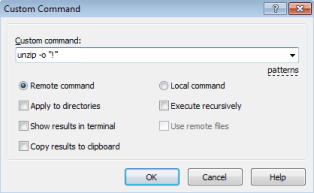
(with WinSCP, right-click on the zip file > Custom Commands > Enter > unzip -o "!")
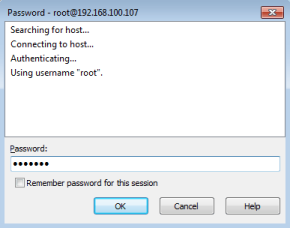
You may be asked to re-authenticate to execute the command remotely:
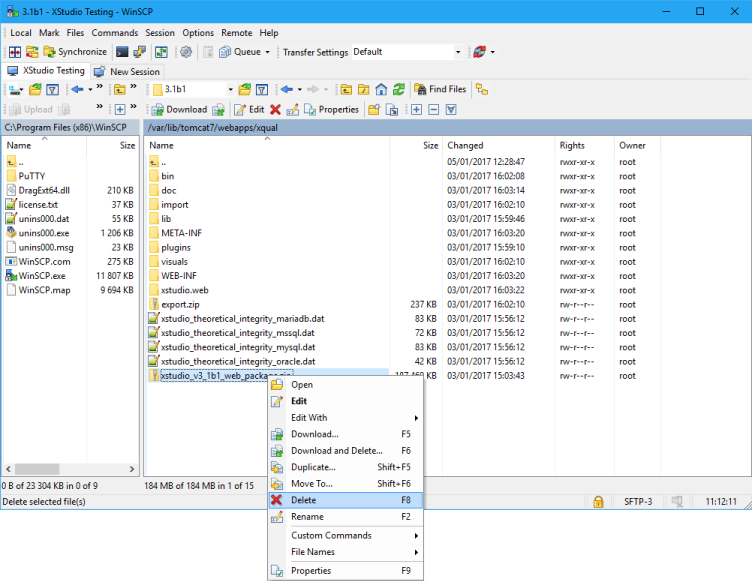
- Delete the zip file (i.e.
xstudio_v12sp1_web_package.zip) in the/var/lib/tomcat8/webapps/xqual/folder of the server
(with WinSCP, right-click on the zip file > Delete)
- Restore all the XStudio's
*.conffiles you backuped in the following folder:
/var/lib/tomcat8/webapps/xqual/xstudio/
- Restore all the REST API Server's
*.conffiles you backuped in the following folder:
/var/lib/tomcat8/webapps/xqual/
-
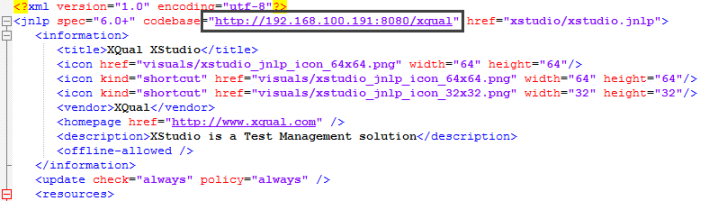
Edit the 3 following files and update manually their codebase attribute (incl. protocol and port)
/var/lib/tomcat8/webapps/xqual/xstudio/xstudio.jnlp/var/lib/tomcat8/webapps/xqual/xstudio/xagent.jnlp/var/lib/tomcat8/webapps/xqual/xstudio/xstudio.php(if any)/var/lib/tomcat8/webapps/xqual/xstudio/xstudio.jsp(if any)
WARNING: do NOT restore your backuped.jnlp,.jspand.phpfiles as the new version may require new parameters in those files.
You previously backed them up only if you need to remember the old codebase setting.
The beginning of thexstudio.jnlpfile should look like:
You just have to save the original configuration files, unzip the
The procedure differs slightly depending on which servlet container you're using. On Windows platforms the most spread is Tomcat.
xstudio_v<version>_web_package.zip, overwrite the existing install and restore your configuration files.The procedure differs slightly depending on which servlet container you're using. On Windows platforms the most spread is Tomcat.
- Backup all the
*.conf,*.jnlpand*.phpfiles.
You can find all these files in:
- theC:\Program Files (x86)\Apache Software Fundation\htdocs\xstudio\bin\folder if your current version of XStudio is <=3.0.
- theC:\Program Files (x86)\Apache Software Fundation\Apache2.2\Tomcat 8.0\xqual\xstudio\folder if your current version of XStudio is >=3.1.
- Backup the
*.conffiles from the existing REST API server if any (note that it is a mandatory step even if you do not plan to use the REST API!)
If you can't find them, then please first configure the REST API server.
You can find all these files in:
- theC:\Program Files (x86)\Apache Software Fundation\Apache2.2\Tomcat 8.0\xqual\folder if your current version of XStudio is >=3.1.
- Download the version of the XStudio Web Server package you wish to update to (from our download section)
- Upload the zip file you downloaded (i.e.
xstudio_v12sp1_web_package.zip) in the
C:\Program Files (x86)\Apache Software Fundation\Apache2.2\Tomcat 8.0\xqual\folder of the server
- Unzip the zip file on the server
- Delete the zip file (i.e.
xstudio_v12sp1_web_package.zip) in the
C:\Program Files (x86)\Apache Software Fundation\Apache2.2\Tomcat 8.0\xqual\folder of the server
- Restore all the XStudio
*.conffiles you backuped in the following folders:
C:\Program Files (x86)\Apache Software Fundation\Apache2.2\Tomcat 8.0\xqual\xstudio\
- Restore all the REST API Server's
*.conffiles you backuped in the following folder (note that it is a mandatory step even if you do not plan to use the REST API!):
C:\Program Files (x86)\Apache Software Fundation\Apache2.2\Tomcat 8.0\xqual\
-
Edit the 3 following files and update manually their codebase attribute
C:\Program Files (x86)\Apache Software Fundation\Apache2.2\Tomcat 8.0\xqual\xstudio\xstudio.jnlpC:\Program Files (x86)\Apache Software Fundation\Apache2.2\Tomcat 8.0\xqual\xstudio\xagent.jnlpC:\Program Files (x86)\Apache Software Fundation\Apache2.2\Tomcat 8.0\xqual\xstudio\xstudio.jsp
WARNING: do NOT restore your backuped.jnlp,.jspand.phpfiles as the new version may require new parameters in those files.
The beginning of thexstudio.jnlpfile should look like:
Restore your data
Your custom launchers
If you developed some custom launchers using the SDK, you need to recompile them using the new SDK and to copy the binaries in the launchers folder.Please click on the appropriate options below:
- Copy your freshly compiled custom launchers (
.jarand.xml) in the/var/lib/tomcat8/webapps/xqual/xstudio/launchers/folder
- Reference your custom launchers in the
/var/lib/tomcat8/webapps/xqual/xstudio/launchers/launchers.xmlfile
- Copy your freshly compiled custom launchers (
.jarand.xml) in the
C:\Program Files (x86)\Apache Software Fundation\Apache2.2\Tomcat 8.0\xqual\xstudio\launchers\folder
- Reference your custom launchers in the
C:\Program Files (x86)\Apache Software Fundation\Apache2.2\Tomcat 8.0\xqual\xstudio\launchers\launchers.xmlfile
Your custom reports
If you developed some custom XSLT reports, you need to copy them on the server.Please click on the appropriate options below:
- Copy your custom reports in the new
/var/lib/tomcat8/webapps/xqual/export.zipfile
This means you must pick the newexport.zipfile, unzip it, copy your custom XSLT files (along with their associated resources i.e. images etc.) in the structure and rezip it.
- Copy your custom reports in the new
C:\Program Files (x86)\Apache Software Fundation\Apache2.2\Tomcat 8.0\xqual\xstudio\export.zipfile
This means you must pick the newexport.zipfile, unzip it, copy your custom XSLT files (along with their associated resources i.e. images etc.) in the structure and rezip it.
Your visuals
If you customized your server with custom splash screens, logo and icons, just check they are still here.Please click on the appropriate options below:
- You should find them in the
/var/lib/tomcat8/webapps/xqual/visualsfolder (if not, copy your backuped files here)
C:\Program Files (x86)\Apache Software Fundation\Apache2.2\Tomcat 8.0\xqual\visuals folder (if not, copy your backuped files here)Restart the service
Restart the database server
Please refer to your Database Server's documentation for all the details about how to restart the service.
Please click on the appropriate options below:
- It consists in running the command:
service mysqld start) (CentOS, RHEL, Fedora) orservice mysql start) (Ubuntu, Debian) ormysql-server start(FreeBSD)
- It consists in starting the service from there: This PC > Right-click > Manage > Services and Applications > Services
Restart Tomcat
To ensure that the REST API server took into account the last changes properly, restart Tomcat.If you're using Tomcat:
With Fedora, Cent OS, Red Hat:
service tomcat restartWith Debian, Ubuntu etc.:
service tomcat8 restartOn some particular linux distributions, this can be done by running 2 scripts:
shutdown.sh then startup.shOn Windows this can be done by running the dedicated
shutdown.bat and startup.bat scripts or restarting the Windows Service (depends on your Tomcat installation choices)For debugging purposes, you can have a look at Tomcat's log to check everything started properly without error. The log file is generally located in
/var/lib/tomcat8/logs/catalina.out. On recent systems you might get it using the command journalctl -u tomcat.On windows, this may also be displayed in a dedicated console window.
Check this log or console. If you see some errors in it you might have to verify the configuration of the REST API server.
If updating to a version < 10, start XStudio JNLP a first time as admin (mandatory step!)
Start normally XStudio (not XStudio.web) from your browser (http://<ip_address>:8080/xqual/xstudio) and log in as admin.If you're updating to a major version, you MAY be asked again for your admin password to confirm you authorize the system to update the schema of the database. Just confirm and continue.
When the migration is completed, XStudio will re-start normally.
If a schema update was necessary, you can use the database integrity checker available from the menu Tools > Check database integrity if you wish to ensure everything's fine.
New mandatory parameters
Also, still during this first start with XStudio, if some new mandatory parameters are required by the new version, a dialog box will automatically pop up giving you the opportunity to fill the missing values.You'll then be able to save the 3 configuration files and upload them to your server.
For instance, if you update from a version <=5 to a version >=6 there will be 3 new parameters to fill in:
rest_api.base_url=<REST API server URL> i.e. http://acme-prod1.myxqual.com/xqual/apirest_api.default_username=<Username to connect to the REST API> (i.e. admin)rest_api.default_password=<Encrypted password to connect to the REST API> (i.e. D6C956C2925A946E)
Once you copied these 3 files to your server in /var/lib/tomcat8/webapps/xqual/xstudio/, don't forget to perform again the following tasks so that the new parameters are also used by the REST API server:
- Copy the configuration files
cp /var/lib/tomcat8/webapps/xqual/xstudio/*.conf /var/lib/tomcat8/webapps/xqual/
- Copy the JDBC drivers
cp -r /var/lib/tomcat8/webapps/xqual/xstudio/jdbc/*/*.jar /var/lib/tomcat8/webapps/xqual/WEB-INF/lib/
- Restart Tomcat
To ensure that the REST API server took into account the last changes properly, restart Tomcat.
With Yum (Fedora, Cent OS, Red Hat):
service tomcat restart
With Apt-get (Debian, Ubuntu etc.):
service tomcat8 restart
For debugging purposes, you can have a look at Tomcat's log to check everything started properly without error. The log file is generally located in/var/lib/tomcat8/logs/catalina.out. On recent systems you might get it using the commandjournalctl -u tomcat.
Check the settings and the user profiles
When some new features that need specific rights are added, their associated rights will be missing from the user profiles so these features are disabled "by default".So when you update, don't forget to check the user profiles to see if you want to add some new rights to some of your profiles.
The same way, in a newer version some of the new features may require some global settings. These settings have all default values but it's a good idea to check those just after an update.
Notify the users the service is back
Check access to:- XStudio.web (i.e.
http://<ip_address>:8080/xqual/xstudio.web/)- XStudio (i.e.
http://<ip_address>:8080/xqual/xstudio/)- the REST API server (i.e.
http://<ip_address>:8080/xqual/api?command=getInfo)and inform all the users the service is back.
That's it! your server is now updated and all your users can reconnect from their browser using the same URL.