

The SUTs
- the version of each SUT
- the functional coverage of each SUT/folder/company (by requirements, by specifications and by tests)
- the number of links determining the functional coverage
- the quality index of each SUT/folder/company
- the number of path leading to a successful test case/total number of path to testcases determining the quality index
- the total number of SUTs
- the number of SUTs in each company/folder

A SUT is an abstract object representing the target we want to test. It can be a hardware device, a software component etc. The SUT must be detailed enough so that we can identify it easily. A SUT should be uniquely defined through its name and version.
It is possible to group/organize the SUTs by creating a structure of companies, folders and sub-folders hosting the SUTs.
Coverage Metrics
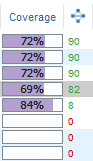
In order to have a quantifiable follow-up of the coverage, the SUT (system under test) tree includes a coverage column showing at a glance the coverage of each SUT in the tree and the number of requirements/specifications/tests covering the SUT. The coverage is also consolidated at the folder/company level.The coverage indicator provides the estimation of completeness in terms of requirements, specifications or tests. The figure on the right-hand side of the coverage progress bar indicates how many links are linking the SUT to some requirements, specifications or tests. If the SUT is linked several times to the same requirement, specification or test through different path, it is counted as different links.
Depending on the type of coverage requested (through the Coverage drop-down menu), the tree will include different kinds of coverage:
By requirements
The SUTs are directly covered by requirements. To view the coverage by requirements:- click on the drop-down list Coverage and select

- the SUT coverage and the number of requirements linked to this SUT are displayed

The coverage of each SUT in the tree is directly taken from the value in its Details tab.
By default, when a SUT is being created, a 0% value will be assigned to it. As soon as one requirement is linked to the current SUT, the coverage indicator of the current SUT will switch automatically to 100%. However, you can edit it manually refining the coverage value between 0% and 100%. For instance, if you think that you will need approximately 10 requirements to cover the SUT and that you already have linked 2 of them, just set the coverage to 20%.
NOTE: This feature is what will allow you to get truely reliable coverage metrics.
NOTE: If no requirement is linked to the current SUT, you cannot edit manually the coverage indicator. If you try to edit it anyway, the following message will popup:


To edit the coverage indicator
- select a SUT
- click on Details menu
- set the value of Coverage by requirements (%) field
- click on submit
- the SUT coverage is modified in the tree

By specifications
The SUTs are indirectly covered by specifications. To view the coverage by specifications:- click on the drop-down list Coverage and select

- the SUT coverage and the number of specifications linked to this SUT are displayed

The coverage of each SUT is calculated based on:
- its coverage by requirements,
- the coverage by specifications and the weigth of each requirement linked to the SUT.

The weigth of each requirement being calculated from its priority using this simple mapping:
| Priority | Weigth | |
| Low | 1 | |
| Normal | 2 | |
| High | 3 |
By tests
The SUTs are indirectly covered by tests. To view the coverage by tests:- click on the drop-down list Coverage and select

- the SUT coverage and the number of tests linked to this SUT are displayed

The coverage of each SUT is calculated based on:
- its coverage by requirements,
- the coverage by specifications and the weigth of each requirement linked to the SUT,
- the coverage by tests and the weigth of each specification linked to the previous requirements.
The weigth of each specification being calculated from its priority using this simple mapping:
| Priority | Weigth | |
| Low | 1 | |
| Normal | 2 | |
| High | 3 |
Coverage aggregation
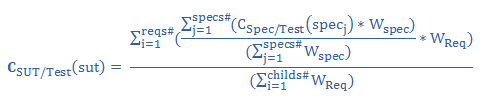
For each folder the coverage is calculated by aggregation, based on the coverage of its underlying objects.For instance, the coverage by requirements of a folder will be calculated using the formula:

Quality Metrics
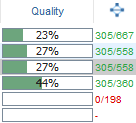
In order to have a quantifiable follow-up of the quality, the SUTs tree includes a coverage column showing at a glance the estimated quality of each SUT in the tree.The quality is also consolidated at the folder/company level.
The quality indicator provides the estimation of the percentage of success of the latest executions of the tests functionally covering the SUT. The figure on the right-hand side of the quality progress bar indicates how many links are linking the SUT to its successful/total test cases. If the SUT is linked several times to the same test/test case through different path, it is counted as different links.
For each node of the corresponding trees (folders), quality will be calculated taking into account the share of successful related tests.
The quality indicator will be an integer with possible values from 0 to 100.
- 0% value means no test linked to the current object is successful.
- 100% value means that coverage is optimal and all linked tests are successful.
The generic quality formula for an object is:

Searching
For more details, refer to the Searching object chapter.The root node
Tabs
Coverage
The Coverage tab will display the coverage details of the root folder in terms of Requirements, specifications (if enabled) and tests.In addition, some advises are given to improve the coverage of the root folder:


Custom fields
You can customize the SUT by creating some new custom fields that will appear in the Details tab of the SUT.Custom fields can have different types: text fields, drop-down menu, checkbox, formatted text field. They can also be marked as mandatory or not and are positionned at the index you specify.
The Custom fields tab allows one to create, edit and delete custom fields.

Create custom field
Here is the process to create a custom field for a SUT:- select the root folder in the tree
- on the right panel, click on the create custom field button

- enter the name, the type, the position, if it's mandatory or not and the default value of the custom field and submit

- the custom field will immediately appears in the panel
- the new custom field is added to all the SUTs assigned with its default value

Edit custom field
Here is the process to edit a custom field for a SUT:- select the root folder in the tree
- on the right panel, select the custom field
- click on the edit custom field button

- change the name, the type, the position, if it's mandatory or not and/or the default value of the custom field and submit

- the custom field immediately appears in the panel with new values
- the custom field is updated on all the SUTs (except its value)

Delete custom field
Here is the process to delete a custom field for a SUT:- select the root folder in the tree
- on the right panel, select the custom field
- click on the delete custom field button

- confirm and submit

- the custom field immediately disappears from the panel
- the custom field is removed from all the SUTs

Toolbar
Create a company
A company can be created only under the root node of the tree.Here is the process to create a new company:
- select the root folder in the tree
- on the right panel, click on the create company button

- enter the name of the company and submit
- the company immediately appears in the tree
Create a report
It may be interesting to export or to print a global report on all the SUTS you have.For more details, refer to the SUTs report chapter.
The company nodes
Tabs
Details
The company details tab allows one to specify the name of the companyCoverage
The Coverage tab will display the coverage details of the selected company in terms of Requirements, specifications (if enabled) and tests.In addition, some advises are given to improve the coverage of the company:


Attachments
For more details, refer to the Attachment chapter.Toolbar
Delete a company
You can delete a company by just clicking this
WARNING: deleting a company will delete all objects linked to this company (i.e. underlying folders and SUTs, sessions, users etc.)
Create a folder
A folder can be created only under a company node or another folder node.Here is the process to create a new folder:
- select a company node in the tree
- on the right panel, click on the create folder button

- enter the name of the folder and submit
- the folder immediately appears in the tree
Create a report
It may be interesting to export or to print a report on all the SUTS belonging to a company.For more details, refer to the SUTs report chapter.
The folder nodes
Tabs
Details
The folder details tab allows one to specify the name and the description of the folder
Coverage
The Coverage tab will display the coverage details of the selected folder in terms of Requirements, specifications (if enabled) and tests.In addition, some advises are given to improve the coverage of the folder:


Attachments
For more details, refer to the Attachment chapter.Toolbar
Create a folder
A folder can be created only under a company node or another folder node.Here is the process to create a new folder:
- select a company node in the tree
- on the right panel, click on the create folder button
- enter the name of the folder and submit
- the folder immediately appears in the tree
Delete a folder
You can delete a folder by just clicking this button
WARNING: deleting a folder will delete all objects linked to this folder (i.e. underlying folders and SUTs, sessions etc.)
Empty a folder
You can empty a folder by just clicking this button
WARNING: emptying a folder will delete all objects linked to its childs (i.e. underlying folders and SUTs, sessions etc.)
Copy a folder
You can copy a folder by just clicking this buttonNote that the copy process will recursively copy also all the inner items (including their links).
Move a folder
You can move a folder by just clicking this buttonCreate a SUT
A SUT can be created only under a folder node.Here is the process to create a new SUT:
- select a folder in the tree (create one if necessary)
- on the right panel, click on the create sut button

- enter the name and the version of the SUT
- (opt.) enter the value of all the custom fields
- submit
- the SUT immediately appears in the tree
Create a SUT Inheriting requirements from another SUT
When you create a new version of a SUT, it's very likely that it will be connected to almost the same requirements than the previous version. Here is the process to create a new SUT inheriting requirements from another SUT:- select a folder in the tree(create one if necessary)
- on the right panel, click on the create sut button
- enter the name and the version of the SUT
- select the Requirements tab
- click the Preset import from SUT settings button

- select the reference SUT and submit
- click the Preset import from SUT button

- the relevant requirements are by default pre-selected
- (opt.) select/deselect some requirements if required
- submit
- the SUT immediately appears in the tree


Create a report
It may be interesting to export or to print a report on all the SUTS under a specific folder.For more details, refer to the SUTs report chapter.
The SUT nodes
Tabs
Details
The SUT Details tab allows one to specify the name, the version of the SUTIf some custom fields have been configured, they will appear here as well (positionned as specified).

Coverage
The SUT Coverage tab will display the coverage details of the selected SUT in terms of requirements, specifications (if enabled) and tests.In addition, some advises are given to improve the coverage of the SUT:


To modify the list of requirements linked to the current SUT, just un-toggle the tree filter
TIP: If you have to select hundreds of requirements this task can be painful and error prone though.
Hopefully, the filtering toolbar at the top of the tree can help you selecting more intelligently the requirements.
For more details, refer to the Filtering chapter.
Hopefully, the filtering toolbar at the top of the tree can help you selecting more intelligently the requirements.
For more details, refer to the Filtering chapter.
WARNING: You can't directly edit the specifications or tests linked to this SUT (these trees are displayed read-only). This must be done through the requirements and the specifications intermediates.
Results
- Progress
- History
- Requirements
- Specifications
- Tests
- Test cases
- Steps
- Per session
- Per configuration
- Per agent
- per operator
- Quality
- Toolbar
To get SUT results:
- switch to the SUT module on the side bar
- in the tree, select the SUT
- on the right panel, select the results tab
- seven tabs progress, requirements, specifications (if enabled), tests, test cases, steps, quality are displayed. Each shows some useful pieces of information:
Progress
To get progress tests results in the interval of dates:- switch to the SUT module on the side bar
- select the SUT in the tree
- on the right panel, select the Results tab
- select the Progress tab
- set the start date and end date and the SUT
- for tests, select the Tests tab to display the progress of the tests
- for tests cases, select the Tests cases tab to display the progress of the tests cases


History
To get the history of ALL the results obtained on the SUT:- switch to the SUT module on the side bar
- select the SUT in the tree
- on the right panel, select the Results tab
- select the History tab

The first stack chart displays all the sessions in a timeline and for each session a breakout of the results.
The second stack chart displays a similar graphic where the results are shown per date rather than session.
Of course, as for all the line charts, bar charts or stack charts in XStudio, you can zoom in and out.
The two following pie charts show a result breakout out of ALL the results obtained in the sessions targeting this SUT.
Requirements
To get requirements results:- switch to the SUT module on the side bar
- select the SUT in the tree
- on the right panel, select the Results tab
- select the Requirements tab to display the results of the requirements

Specifications
To get specifications results:- switch to the SUT module on the side bar
- select the SUT in the tree
- on the right panel, select the Results tab
- select the Specifications tab to display the results of the specifications

Tests
To get tests results:- switch to the SUT module on the side bar
- select the SUT in the tree
- on the right panel, select the Results tab
- select the Tests tab to display the results of the tests

Test cases
To get test cases results:- switch to the SUT module on the side bar
- select the SUT in the tree
- on the right panel, select the Results tab
- select the Test cases tab to display the results of the test cases

Steps
To get steps results:- switch to the SUT module on the side bar
- select the SUT in the tree
- on the right panel, select the Results tab
- select the Steps tab to display the results of the steps.

Per session
To get the per session results:- switch to the SUT module on the side bar
- select the SUT in the tree
- on the right panel, select the Results tab
- select the Per session tab to display the results per session.

Per configuration
To get the per configuration results:- switch to the SUT module on the side bar
- select the SUT in the tree
- on the right panel, select the Results tab
- select the Per configuration tab to display the results per configuration.

Per agent
To get the Per agent results:- switch to the SUT module on the side bar
- select the SUT in the tree
- on the right panel, select the Results tab
- select the Per agent tab to display the results per agent.

Per operator
To get the Per operator results:- switch to the SUT module on the side bar
- select the SUT in the tree
- on the right panel, select the Results tab
- select the Per operator tab to display the results per operator.

Quality
Quality tab show the two quality indexes: "All path" algorithm and "Single path" algrithm.To get quality results:
- switch to the SUT module on the side bar
- select the SUT in the tree
- on the right panel, select the Results tab
- select the Quality tab to display the quality of the results.

Toolbar
In the Tests/Test cases/Steps tabs, one can reorder the columns, resize them, sort on the columns content, add some optional columns, create some filters and export the table to Excel.
To add optional columns:
- select the Tests/Testcases/Steps tab
- click on the add/remove optional columns button

- the column picker pop up displays
- check an attribute and submit
- the new optional column appears on the right of panel


- select the Tests/Testcases/Steps tab
- click on the add/remove optional columns button
- the column picker pop up displays
- uncheck an attribute and submit
- the new optional column disappears on the right of panel

To create some filter:
- select the Tests/Testcases/Steps tab
- click on the filter the content of the table button

- the column filter pop up displays
- Enter filter values: timestamp, results, operator... and submit
- table is reloaded with filter values


To edit filter:
- select the Tests/Testcases/Steps tab
- click on the filter the content of the table button

- the column filter pop up displays
- Edit filter values: ready for manual run, results, operator... and submit
- table is reloaded with new filter values


To export the table to excel format:
- select the Tests/Testcases/Steps tab
- click on the Export to Excel button

- select the destination folder for the report
- submit
- the report automatically opens


To clear filter;
Bugs
Found in this SUT
This tab shows all the bugs that have been found on the selected SUT.Bugs may have been found on this SUT from two different ways:
- either they have been submitted independently and manually from the bugs tree,
- or they may have been found through a failed test and link to this test execution.

Fixed in this SUT
This tab shows all the bugs that have been marked as fixed on the selected SUT.
Statistics
The Statistics tab will display some metrics based on all the bugs found on this SUT:- A status breakout pie chart showing how many bugs exist for each status
- A severity breakout pie chart showing how many bugs exist for each severity
- A priority breakout pie chart showing how many bugs exist for each priority
- A status - severity breakout stack chart showing how many bugs with each severity for each status
- A status - priority breakout stack chart showing how many bugs with each priority for each status
- A assignee - status breakout stack chart showing how many bugs with each status for each assignee
- A assignee - severity breakout stack chart showing how many bugs with each severity for each assignee
- A assignee - priority breakout stack chart showing how many bugs with each priority for each assignee
- A active bug age - status breakout stack chart showing the status breakout depending on the age of the active bugs
- A active bug age - severity breakout stack chart showing the severity breakout depending on the age of the active bugs
- A active bug age - priority breakout stack chart showing the priority breakout depending on the age of the active bugs

Progress
This tab shows all the bugs progress for the selected SUT.

Attachments
For more details, refer to the Attachment chapter.Revisions (versioning)
This tab shows all the revisions of the selected SUT.You can open a specific revision of the SUT by selecting a revision in the list and clicking on the open button.

Changes (audit log)
XStudio allows tracking any changes on a particular object.To check the history of a SUT:
- select the SUT in the tree
- open the Changes tab on the right panel
- the panel shows a table gathering all the dated changes.
On a SUT you will get a panel similar to this one:
TIP: You can directly edit a user's details by clicking on his/her name in the changes table.
Toolbar
Delete a SUT
You can delete a SUT by just clicking this button
WARNING: deleting a SUT will delete all objects linked to this SUT (i.e. sessions etc.)
Copy a SUT
You can copy a SUT by just clicking this buttonThe copy process will copy also the links in between the selected SUT and its requirements.
Move a SUT
You can move a SUT by just clicking this buttonCreate a report
It may be interesting to export or to print a report on just one specific SUT.For more details, refer to the SUTs report chapter.