

|
Prerequisites
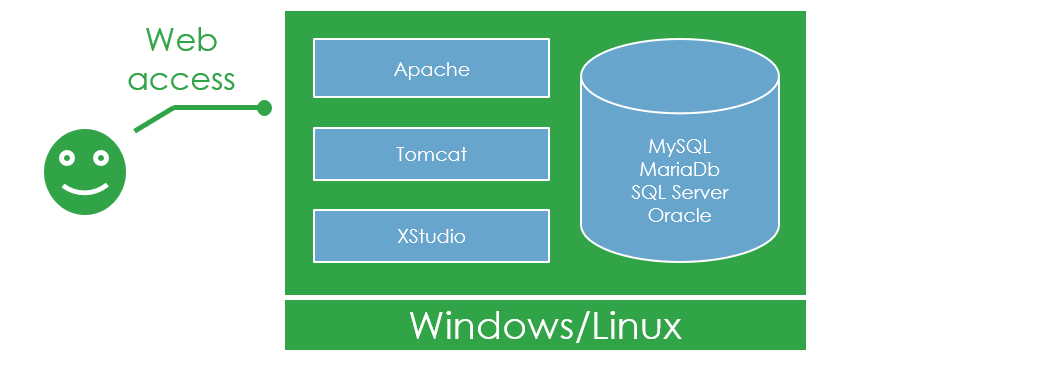
To install a XQual Server from scratch, you'll need a Linux Server or a Windows server with a network connection, enough storage and memory. For more details check the minimal requirements.Install Tomcat
A Servlet Container is web-server able to run web services and web sites. It will be used to host:
- the XQual Server,
- the XQual Web Application,
- the REST-API server,
- the Jira plugin front-end (necessary only if you use Jira and wish a both-way integration),
- the SSO service
Please click on the appropriate option below:
You can use the servlet container you prefer (there is no specific requirements about it) but on Linux platforms the most widely used is Apache Tomcat server.
The Install procedure may differ depending on the Linux distribution you're using but most of the time it will consist in these commands (executed as root):
with Apt-get (Debian, Ubuntu etc.):
You can install Tomcat 9 manually using:
with Apt-get (Debian, Ubuntu etc.):
The Install procedure may differ depending on the Linux distribution you're using but most of the time it will consist in these commands (executed as root):
Install Java
With Yum (Fedora, Cent OS, Red Hat):yum updateyum install java-1.8.0-openjdkwith Apt-get (Debian, Ubuntu etc.):
apt-get updateapt-get install openjdk-8-jreInstall Apache Tomcat 9
With Yum (Fedora, Cent OS, Red Hat):yum updateyum install tomcatyum install tomcat-webappsyum install tomcat-admin-webappschkconfig tomcat onservice tomcat startYou can install Tomcat 9 manually using:
wget https://downloads.apache.org/tomcat/tomcat-9/v9.0.106/bin/apache-tomcat-9.0.106.tar.gztar -xvzf apache-tomcat-9.0.106.tar.gzmv apache-tomcat-9.0.106 /var/lib/tomcat9with Apt-get (Debian, Ubuntu etc.):
apt-get updateapt-get install tomcat9apt-get install tomcat9-adminchkconfig tomcat9 onservice tomcat9 startConfigure Apache Tomcat
Edit (as root) the tomcat configuration file (/var/lib/tomcat9/conf/tomcat-users.xml or /etc/tomcat8/tomcat-users.xml) and add the following entries:
						<role rolename="admin"/>

						<role rolename="admin-gui"/>

						<role rolename="manager"/>

						<role rolename="manager-gui"/>

						<user username="tomcat" password="tomcatpwd" roles="admin,admin-gui,manager,manager-gui"/>
You can use the servlet container you prefer (there is no specific requirements about it) but on Windows platforms the most spread is Apache Tomcat.
Most of the time it will consist in just running the setup program (executed as Administrator):
Most of the time it will consist in just running the setup program (executed as Administrator):
Install Java
- Install/Update Java (7 or 8) directly from http://www.java.com/
or directly by downloading a setup program from our own repository:
JRE 8 update 40 for Windows 32bits
JRE 8 update 40 for Windows 64bits
- When you are on the http://www.java.com/ page, just click on the Free Java Download button and follow the instructions.
If you prefer installing from a setup program (i.e.jre-8u40-windows-i586.exe), you'll get similar screens.
Choose the default options except when specified.
jxpinstall.exe is a very small executable that will download then install the Java Runtime package
(these are the first screens you will see if you chose to install Java using a setup program)
Untick the Restore Java security prompts
If you ask to verify the java version, you will be prompted to authorize the Java Detection applet to execute.
Click Run.
Install Apache Tomcat
- Download Apache Tomcat from https://tomcat.apache.org/
- Execute the setup program (i.e.
apache-tomcat-9.0.106.exe)
Choose the default options except when specified.
Select the Full install type
Create an admin user (i.e. tomcat) and assign it a password (i.e. tomcatpwd).
In the roles list, add manager.
Install the Database Server
Before installing the software, please ensure you have enough physical storage on the database server to host all the data that you're going to create.
Of course, you can also choose to install the database server on teh same physical machine as teh one hosting Tomcat.Please click on the appropriate options below:
On a Linux server, you can use MySql, MariaDb or Oracle (less advised).
Starting from XQual v1.2, MySQL 5.0.3 is the minimum version required but more recent versions are preferred.
The Install procedure may differ depending on the Linux distribution you're using but most of the time it will consist in these commands (executed as root):
With Yum (Fedora, Cent OS, Red Hat):
You will have to set the root password (i.e. rootpwd)
Answer 'y' to all questions except "Disallow root login remotely?" where you need to answer 'n'
With Apt-get (Debian, Ubuntu etc.):
You will have to set the root password (i.e. rootpwd)
Answer 'y' to all questions except "Disallow root login remotely?" where you need to answer 'n'
To manually enable root access from remote machines:
The Install procedure may differ depending on the Linux distribution you're using but most of the time it will consist in these commands (executed as root):
With Yum (Fedora, Cent OS, Red Hat):
yum updateyum install mysql-serverYou will have to set the root password (i.e. rootpwd)
/usr/bin/mysql_secure_installationAnswer 'y' to all questions except "Disallow root login remotely?" where you need to answer 'n'
chkconfig mysqld onservice mysqld startWith Apt-get (Debian, Ubuntu etc.):
apt-get updateapt-get install mysql-serverYou will have to set the root password (i.e. rootpwd)
/usr/bin/mysql_secure_installationAnswer 'y' to all questions except "Disallow root login remotely?" where you need to answer 'n'
chkconfig mysqld onservice mysqld startTo manually enable root access from remote machines:
									mysql -u root -p

									GRANT ALL PRIVILEGES ON *.* TO 'root'@'%' IDENTIFIED BY 'rootpwd'
MariaDb 10.0.10 is the minimum version required but more recent versions are preferred.
The Install procedure may differ depending on the Linux distribution you're using but most of the time it will consist in these commands (executed as root):
With Yum (Fedora, Cent OS, Red Hat):
You will have to set the root password (i.e. rootpwd)
Answer 'y' to all questions except "Disallow root login remotely?" where you need to answer 'n'
With Apt-get (Debian, Ubuntu etc.):
You will have to set the root password (i.e. rootpwd)
Answer 'y' to all questions except "Disallow root login remotely?" where you need to answer 'n'
If these commands fail to execute, ensure you have MariaDb to your source package list using
To manually enable root access from remote machines:
The Install procedure may differ depending on the Linux distribution you're using but most of the time it will consist in these commands (executed as root):
With Yum (Fedora, Cent OS, Red Hat):
yum updateyum install MariaDB-server or yum install mariadb-serverYou will have to set the root password (i.e. rootpwd)
/usr/bin/mysql_secure_installationAnswer 'y' to all questions except "Disallow root login remotely?" where you need to answer 'n'
chkconfig mariadb on or chkconfig mysql on or systemctl enable mariadbservice mariadb start or service mysql start or systemctl start mariadbWith Apt-get (Debian, Ubuntu etc.):
apt-get updateapt-get install mariadb-serverYou will have to set the root password (i.e. rootpwd)
/usr/bin/mysql_secure_installationAnswer 'y' to all questions except "Disallow root login remotely?" where you need to answer 'n'
chkconfig mysql onservice mysql startIf these commands fail to execute, ensure you have MariaDb to your source package list using
apt-key and add-apt-repository (refer to the documentation of your version of MariaDb for more details).
To manually enable root access from remote machines:
									mysql -u root -p

									GRANT ALL PRIVILEGES ON *.* TO 'root'@'%' IDENTIFIED BY 'rootpwd'
Oracle 11g is the minimum version required but more recent versions are preferred.
You can use an Oracle Database server to host XQual's database.
Oracle Database / Oracle Database 11g is a commercial product.
Please contact Oracle if you wish to to purchase/install an Oracle Database edition.
You can use an Oracle Database server to host XQual's database.
Oracle Database / Oracle Database 11g is a commercial product.
Please contact Oracle if you wish to to purchase/install an Oracle Database edition.
On a Windows server, you can use MySql, MariaDb or SQL Server (less advised).
Starting from XQual v1.2, MySQL 5.0.3 is the minimum version required but more recent versions are preferred.
- Download the MySQL Database Server from http://dev.mysql.com/downloads/mysql
or directly from our own repository MySql 5.6.25.0 for Windows 32bits/64bits
- Execute the setup program (i.e.
mysql-installer-community-5.6.25.0.msi)
Choose the default options except when specified.
Select the most appropriate setup type (i.e. Server only)


Select the most appropriate Config Type (i.e. Server Machine)

Provide the root paswword (i.e. rootpwd)
MariaDb 10.0.10 is the minimum version required but more recent versions are preferred.
- Download the MariaDb Database Server from https://downloads.mariadb.org/
or directly from our own repository:
MariaDb 10.0.20 for Windows 32bits
MariaDb 10.0.20 for Windows 64bits
- Execute the setup program (i.e.
mariadb-10.0.20-winx64.msi)
Choose the default options except when specified.
Provide the root paswword (i.e. rootpwd)
In addition, don't forget to tick:
- the Enable Access from remote machines for 'root' user checkbox
- the Use UTF8 as default server's character set checkbox
SQL Server 2005 is the minimum version required but more recent versions are preferred.
You can use a Microsoft SQL Server Database server to host XQual's database.
SQL Server is a commercial product.
Please contact Microsoft if you wish to to purchase/install an SQL Server.
You can use a Microsoft SQL Server Database server to host XQual's database.
SQL Server is a commercial product.
Please contact Microsoft if you wish to to purchase/install an SQL Server.
Once you installed SQL Server, there is an important point to double-check: your server MUST have the TCP/IP protocol enabled:
IMPORTANT: With SQL Server, it is required to set the database server (or at least the database that is going to be created by the system) with a language that supports implicit date time format
For instance you can set the default language as English or us-english.
Note that this will NOT prevent from storing accentuated characters in other language-sets (including asian's).
yyyy-mm-dd.For instance you can set the default language as English or us-english.
Note that this will NOT prevent from storing accentuated characters in other language-sets (including asian's).
Install XQual
This is where we are going to install XQual in Tomcat.Please click on the appropriate option below:
- Download the version of the XQual Server you wish to install (from our download section)
cd /var/lib/tomcat8/webapps
mkdir xqual
(only lowercase characters)cd xqual
wget https://xqual-mirror1.myxqual.com/releases/<ver>/xqual_server_v<ver>.zip
(i.e. XQual server v14sp14)
- Unzip the zip file
unzip xqual_server_v<version>.zip
- Delete the zip file
rm -f xqual_server_v<version>.zip
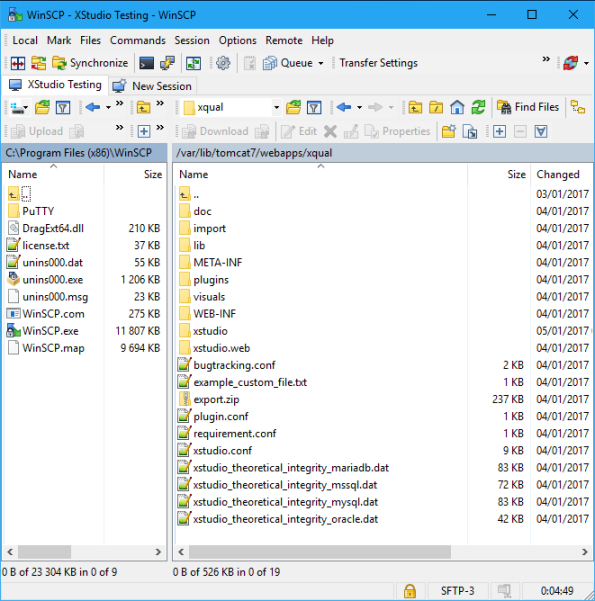
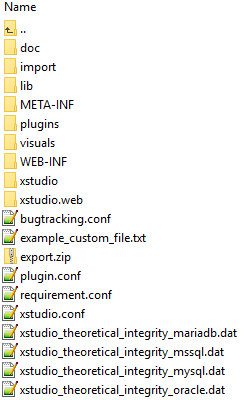
- In the end, you must have a structure similar to this one:
- Download the version of the XQual Server you wish to install (from our download section)
Create a folderxqualinC:\Program Files\Apache Software Foundation\Apache 7.0\webapps(only lowercase characters)
Downloadhttps://xqual-mirror1.myxqual.com/releases/<ver>/xqual_server_v<ver>.zipand save it toC:\Program Files\Apache Software Foundation\Apache 7.0\webapps\xqual
(i.e. XQual server v14sp14)
- Unzip the zip file
- Delete the zip file
- In the end, you must have a structure similar to this one in
C:\Program Files\Apache Software Foundation\Apache 7.0\webapps\xqual:
Configure XQual
Database
Upload the JDBC drivers (only if using SQL Server or Oracle - less advised)
Please click on the appropriate option below:
The Database server is...
With MySql, you have nothing to do as the default JDBC drivers for MariaDb are 100% compatible with MySql.
With MariaDb, you have nothing to do as the JDBC drivers are pre-installed.
- Download the JDBC driver for SQL Server from Microsoft
or directly from our own repository SQL Server JDBC driver 4.0 and 4.1
- Unzip the zip file
- Copy the full
sqljdbc_3.0folder inC:\Program Files\Apache Software Foundation\Tomcat 8.0\webapps\xqual\xstudio\jdbc\
At the end, you should have this path available on the server:
C:\Program Files\Apache Software Foundation\Tomcat 8.0\webapps\xqual\xstudio\jdbc\sqljdbc_3.0\enu\sqljdbc4.jar
- Now, copy just the
sqljdbc4.jarfile inC:\Program Files\Apache Software Foundation\Tomcat 8.0\webapps\xqual\WEB-INF\lib\
- Download the JDBC driver for Oracle from http://www.oracle.com/technetwork/apps-tech/jdbc-112010-090769.html
or directly from our own repository Oracle 11g R2 driver for java 6+
- Copy the full
oracle-11g-R2folder in/var/lib/tomcat8/webapps/xqual/xstudio/jdbc/
At the end, you should have this path available on the server:
/var/lib/tomcat8/webapps/xqual/xstudio/jdbc/oracle-11g-R2/ojdbc6.jar
- Additionally, copy just the
ojdbc6.jarfile in/var/lib/tomcat8/webapps/xqual/WEB-INF/lib/
Install a database server management client
A this stage, we strongly suggest to install a tool so that you can manage your Database Server remotely.To do so, you can install:
- either a web management tool (i.e. PhpMyAdmin) on the server and connect from any client using a simple browser
- or a Database management tool (i.e. SQLyog) on any client (NOT the server!). You can install it on your own personal computer as it's very light.
In the following we'll use SQLyog Community Edition (to connect to a MySql/MariaDb Database Server) as it's free, light to install, very simple to use and powerful at the same time (but you can use any another tool such as Toad if you prefer).
This must be installed on your computer, not on the server!
- Download SQLyog Community Edition from https://github.com/webyog/sqlyog-community
or directly from our own repository:
SQLyog Community Edition for Windows 32bits
SQLyog Community Edition for Windows 64bits
- Execute the setup program (i.e.
SQLyog-12.0.9-0.x64Community.exe)
Choose the default options except when specified.
- Execute SQLyog and connect to the remote Database Server:
Click on the Create a new connection button
Provide a name for that connection
Provide the IP address (or name) of the database server as well as the credentials to connect as root on the remote Database Server (i.e. rootpwd)
Test the connection, Save it and Connect
You're now connected to your remote database server and you can manage it.
Create an empty database and an account to access it
- Keep the SQLyog connection open
Select the Database > Create Database menu item
Provide a name for the database: xstudio_db
You have now a new empty xstudio_db database
Open the User Manager
Create the user xstudio (ensure you have % selected in the Host combobox!)
and provide a password for this user (IMPORTANT: set it initally to xstudiopwd - you'll be able to change it later!)
Open the User Manager
Grant all the rights to xstudio@% on the newly created xstudio_db database
For security reason, this xstudio account has rights only on the xstudio_db database.
XQual will internally query the database only with this account.
Server Settings
Update the server settings
- Update the server configuration:
- On Linux: edit
/var/lib/tomcat8/webapps/xqual/xstudio.conf - On Windows: edit
C:\Program Files (x86)\Apache Software Foundation\Tomcat 8.0\webapps\xqual\xstudio.conf
...and update the following entries:
You must also provide information how to connect to the REST API:Field Description Database server type database.typeThis indicates which database server you're using:
- MySql
- MariaDB
- Oracle
- SQL Server
driver jar path database.driver.jarpathThis indicates where XQual can find the JDBC driver to connect to the database. This field must indicates the relative path from <Install_folder>\bin\jdbcfolder to the jar file.
- MySql:
mariadb-java-client-1.1.5/mariadb-java-client-1.1.5.jar(we advise using the MariaDb JDBC driver even with MySql) - MariaDB:
mariadb-java-client-1.1.5/mariadb-java-client-1.1.5.jar - Oracle:
oracle-11g-R2/ojdbc6.jar - SQL Server:
sqljdbc_3.0/enu/sqljdbc4.jar
driver class path database.driver.classpathClasspath to instantiate the driver from the JAR file.
- MySql:
org.mariadb.jdbc.Driver - MariaDB:
org.mariadb.jdbc.Driver - Oracle:
oracle.jdbc.driver.OracleDriver - SQL Server:
com.microsoft.sqlserver.jdbc.SQLServerDriver
database server database.serverThis indicates the IP address or the name of the database server. database name database.nameThe name of the database (i.e. xstudio_db)
connection template database.connection.templateConnection template to use the JDBC driver.
WARNING: do NOT replace database_server and database_name fields in the connection template.
They will be automatically replaced by the system with what you specified in database server and database name fields.
For instance:
- MySql:
jdbc\:mysql\://database_server:3306/database_name - MariaDB:
jdbc\:mysql\://database_server:3306/database_name - Oracle:
jdbc\:oracle\:thin\:@//database_server:1521/database_name - SQL Server:
jdbc\:sqlserver\://database_server;databaseName=database_name;
Do not forget the '\' character to escape any ':' character in this template.username database.connection.usernamexstudio
password database.connection.password560B599C2331BE79C3ADD6621DBE8BDC (encrypted version of xstudiopwd which is the initial password of the xstudio db account)
Max number of connections
(default 64)database.max_number_connectionsThis defines how many connections can be opened by each client.
Usually, this never exceeds 5.
For instance:32
Field Description REST API base url rest_api.base_urlThis indicates the bae URL pointing to the REST API (i.e. http://<Tomcat server name or IP address>:8080/xqual/api)br/> Do not forget the '\' character to escape any ':' character in this template.REST API default username rest_api.default_usernameadmin
REST API default password rest_api.default_password14594A028745E255AA16A9D6D37D8D61 (encrypted version of password which is the initial password of the admin XQual user)
You can leave all the other setting as-is for now.
At this point, you can check you have those critical settings set similarly to:... database.connection.accept_any_certificate=0 database.connection.certificate= database.connection.password=560B599C2331BE79C3ADD6621DBE8BDC database.connection.template=jdbc\:mysql\://database_server/database_name database.connection.username=xstudio database.driver.classpath=org.mariadb.jdbc.Driver database.driver.jarpath=lib/mariadb-java-client-1.7.4.jar database.max_number_connections=64 database.name=xstudio_db database.server=my_db_server.domain.com database.type=MariaDB ... rest_api.base_url=http\://my_tomcat_server.domain.com:8080/xqual/api rest_api.default_password=D6C956C2925A946E rest_api.default_username=admin ...
NOTE: if your database server is not hosted in your private network, you can also configure your server so that the servlet connects through ssh.
In that case, you do not need to open your database server port (i.e. 3306 if you're using MySql) which will facilitate the install if your company have strict firewall rules.
In addition, if you do so, all the communications are then encrypted which is great in terms of security/confidentiality if you're connecting to a remote server and do not use VPN.
This is a quite rare setup as usually both Tomcat and the database server are hosted on the same network. The communication between the end users and the server are anyway secured with SSL. However, if you're interested in encrypting also the communication between the server and the database server, you can find all the details about how to configure your system with ssh in the connecting through ssh section of the documentation.
- The server will need a few additional libraries to be able to generate reports.
On each system it can be pretty different but on a headless fedora server for instance you will need
to install those libs this way:
					dnf install -y atk

					dnf install -y at-spi2-atk

					dnf install -y cups-libs

					dnf install -y libdrm

					dnf install -y libXcomposite

					dnf install -y libXdamage

					dnf install -y libXrandr

					dnf install -y mesa-libgbm

					dnf install -y libxkbcommon

					dnf install -y pango

					dnf install -y alsa-lib
- Ensure everything in the converthtml folder is executable
chmod a+x /var/lib/tomcat8/webapps/xqual/converthtml
If you're using SELinux (a Linux security module that makes it possible to define a mandatory access control policy for the elements of the system), you must authorize Tomcat to connect to the database.
To do this, run the command:setsebool -P tomcat_can_netork_connect_db 1 - On Linux: edit
Restart the tomcat server
-
Please click on the appropriate option below:
Restart Tomcat
To ensure that the server took into account the last changes properly, restart Tomcat.
With Yum (Fedora, Cent OS, Red Hat):
systemctl restart tomcatorservice tomcat restarton older systems
With Apt-get (Debian, Ubuntu etc.):
service tomcat8 restart
For debugging purposes, you can have a look at Tomcat's log to check everything started properly without error. The log file is generally located in/var/lib/tomcat8/logs/catalina.out. On recent systems you might get it using the commandjournalctl -u tomcat.
Restart the Apache Tomcat 8.0 Windows Service
Configure the XAgent's JNLP access (only necessary if you have automated tests)
Please click on the appropriate option below:
-
Edit the following file
/var/lib/tomcat8/webapps/xqual/xstudio/xagent.jnlpand Set the codebase attribute (incl. protocol and port) of each of these files with the URL that points to where you unzipped the XQual Web Package (i.e.http://<Tomcat server name or IP address>:8080/xqual).
- Copy the configuration files
cp /var/lib/tomcat8/webapps/xqual/*.conf /var/lib/tomcat8/webapps/xqual/xstudio/
-
Edit the following file
C:\Program Files\Apache Software Foundation\Tomcat 8.0\webapps\xqual\xstudio\xagent.jnlpand Set the codebase attribute (incl. protocol and port) of each of these files with the URL that points to where you unzipped the XQual Web Package (i.e.http://<Tomcat server name or IP address>:8080/xqual).
- Copy the configuration files
CopyC:\Program Files (x86)\Apache Software Foundation\Tomcat 8.0\webapps\xqual\*.conf
toC:\Program Files (x86)\Apache Software Foundation\Tomcat 8.0\webapps\xqual\xstudio\
Install a Tomcat watchdog (only if you need to manage server configuration and restart Tomcat from the UI)
If you want to authorize your XQual admin to modify the server settings and restart Tomcat directly from the UI, you will need to create and install a watchdog script that will check regularly the presence of a file/var/lib/tomcat8/webapps/xqual/tomcat_watchdog.flag.
If that file exists, the watchdog will need to:
- Immediately rename the file
tomcat_watchdog.flagtotomcat_watchdog.flag.processing - Wait at least 3 seconds
- Restart Tomcat (for instance with
Systemctl restart tomcat - delete the file
tomcat_watchdog.flag.processing
#!/bin/sh

DATE=`date +%y_%m_%d_%H_%M`
FLAG="/var/lib/tomcat8/webapps/xqual/tomcat_restart.flag"
LOG="/var/lib/tomcat8/webapps/xqual/tomcat_restart.log"

if [ -f "$FLAG" ]; then
   mv "$FLAG" "$FLAG.processing" || exit 0

   echo "indicating that the restart is about to start at '$DATE'..." >> "$LOG"

   # wait 3 seconds so that the restartServer() REST API has time to send the response
   sleep 3

   echo "Restart requested at '$DATE'" >> "$LOG"

   if systemctl restart tomcat; then
      echo "Restart successful at '$DATE'" >> "$LOG"
      rm -f "$FLAG.processing"
   else
      echo "Restart failed on '$DATE'" >> "$LOG"
   fi
fi
This script must be called every 20 seconds.It can be installed in
/usr/sbin for instance and called regularly using the cron daemon:
* * * * * root /usr/sbin/tomcat_watchdog.sh
* * * * * root sleep 20; /usr/sbin/tomcat_watchdog.sh
* * * * * root sleep 40; /usr/sbin/tomcat_watchdog.sh
You may need to adapt the script to the OS/distrib/shell version you're using.
Check the install
Now that the install is completed, let's check your server is fully operational.Start XQual from any computer
- Open the URL:
http://<Tomcat server name or IP address>:8080/xqual/xstudio.web/and login
- Authenticate to XQual using the default credentials:
Username: admin Password: password
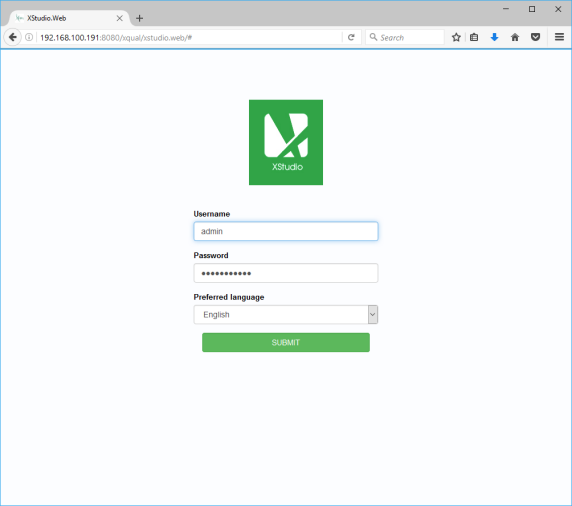
- XQual's GUI appears on the screen.
Try the REST API
You can access programmatically the XQual REST-API server using the following URL:http://<Tomcat server name or IP address>:8080/xqual/api?<query>For instance, you can browse the URL:
http://<Tomcat server name or IP address>:8080/xqual/api?command=getInfoThis should return a json string containing information about the server similar to:
{"application_title":"XQual","application_copyright":"(c) copyright XQual",
"application_version":"3.0sp8", "database_schema_version":"78"}
For more information on the types of queries you can post please refer to the REST API documentation.