

Integration with third-party bugs
XQual includes an integrated Bug-tracking module but can also interface with third-party bug-tracking systems.Jira (REST)
The REST API is normally activated by default in your Jira install.Run XQual and open the menu
Settings > Server Settings > Connectors > Bug-Tracking.
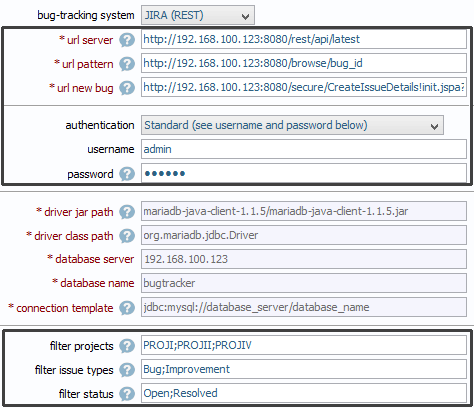
Then, select Jira (REST) in the popup's selection combobox and set the following parameters (replace the login name, the password, the IP address and the port by your Jira settings):
| Field | Description |
| authentication | You can authenticate to Jira using two methods:
|
| username | Username of a full-access Jira account able to see all the bugs you wish to retrieve For instance: user1 |
| password | Password associated to the username or a dedicated API token For instance: user1_password
Starting from June 3rd, 2019, Atlassian deprecated the BasicAuth authentication with passwords.
Hence, API Tokens must be used rather than passwords. So please generate an API token dedicated to XQual and use this API token instead of the password in XQual's configuration. |
| url pattern | This indicates the URL to use with your Jira instance to edit a bug. The URL must include the tag 'bug_id' that will be dynamically replaced by the id of the bug to be displayed/edited For instance: https://acme.atlassian.net/browse/bug_id |
| url new bug | This indicates the URL to use with your Jira instance to create a new bug. The URL can include the tag 'project_id' that will be used as the default project when you create a new bug The URL can include the tag 'bug_description' that will be used to prepopulate the summary of the new bug The URL can include the tag 'step_to_reproduce' that will be used to prepopulate the description of the new bug For instance: http:// 192.168.100.104:8080/secure/CreateIssue.jspa?&pid=project_id&issuetype=1If you wish to pre-populate your issue while executing the tests you can use a URL similar to: https://acme.atlassian.net/secure/CreateIssueDetails!init.jspa?pid=project_id&issuetype=1&summary=bug_description&description=step_to_reproduce (note that there is some limitation on size for the URL - i.e. if the URL is too large, Jira may not populate the description field) You can also prepopulate custom fields if you wish by using their id: https://acme.atlassian.net/secure/CreateIssueDetails!init.jspa?pid=project_id&issuetype=1&customfield_10123=step_to_reproduce
How to find the Id of an issue type?
|
| url server | This indicates the URL of your Jira's REST-API server. For instance: https://acme.atlassian.net/rest/api/latest |
| filter projects | The list of project code names separated by ';' characters For instance: PROJ1;PROJ2When left empty, issues from all projects are retrieved. |
| filter issue types | The list of issue types that you wish to retrieve in the tree separated by ';' characters For instance: Bug;Improvement;New FeatureWhen left empty, issues with any type are retrieved. |
| filter status | The list of status that you wish to filter separated by ';' characters For instance: Open;In ProgressWhen left empty, issues with any status are retrieved. |
| Accept ANY TLS/SSL certificate | If you connect to your Jira server using a SSL connection and you trust the network, just check this checkbox to accept any certificate. Note that if you do so and if your environment is not safe, you're subject to a man-in-the-middle attack. For more information on this, check the Secure connections chapter. |
| Certificate (needed only with https URL) | If you connect to your Jira server using a SSL connection (https:// url), you'll need to copy here the server's certificate. For more information on this, check the Secure connections chapter. |
The keywords
project_id and bug_id are dynamically replaced by XQual when necessary.
Note: the configuration above will let you integrate perfectly with Jira.
This means you will be able to have all the Jira main information directly from XQual.
The links in between the failed tests and the Jira issues are stored in XQual database.
In addition to this, if you have XQual 3.1+, you can also benefit from a BOTH-WAY Integration if you install our Jira add-on in your Jira instance.
With this add-on, you'll be able to have the XQual information (SUTs impacted by an issue, Test campaigns, sessions or exploratory sessions that found the issue and even Requirements impacted by the issue) available from Jira without leaving Jira. This is the perfect tool for the developers and testers to communicate efficiently.
If you're interested in a both-way integration with Jira, please check the Jira add-on installation procedure.
Gitlab (REST)
The REST API is normally activated by default in your Gitlab install.Run XQual and open the menu
Settings > Server Settings > Connectors > Bug-Tracking.
Then, select Gitlab (REST) in the popup's selection combobox and set the following parameters (replace the login name, the password, the IP address and the port by your Gitlab settings):
| Field | Description |
| authentication | You can authenticate to Gitlab using two methods:
|
| username | Username of a full-access Gitlab account able to see all the bugs you wish to retrieve For instance: user1 |
| password | Password associated to the username OR a dedicated API token For instance: user1_password
|
| url pattern | This indicates the URL to use with your Gitlab instance to edit a bug. The URL must include the tags 'project_id' and 'bug_id' that will be dynamically replaced by the id of the bug to be displayed/edited For instance: https://gitlab.com/project_id/-/issues/bug_id |
| url new bug | This indicates the URL to use with your Gitlab instance to create a new bug. The URL can include the tag 'project_id' that will be used as the default project when you create a new bug For instance: https://gitlab.com/project_id/-/issues/new |
| url server | This indicates the URL of your Gitlab's REST-API server. For instance: https://gitlab.com/api/v4 |
| filter projects | The list of project code names separated by ';' characters For instance: project-1;project-2When left empty, issues from all projects are retrieved. |
| filter status | The list of issue types that you wish to retrieve in the tree separated by ';' characters |
| filter custom argument | The list of status that you wish to filter separated by ';' characters For instance: labels[]=user-story |
| Accept ANY TLS/SSL certificate | If you connect to your Gitlab server using a SSL connection and you trust the network, just check this checkbox to accept any certificate. Note that if you do so and if your environment is not safe, you're subject to a man-in-the-middle attack. For more information on this, check the Secure connections chapter. |
| Certificate (needed only with https URL) | If you connect to your Gitlab server using a SSL connection (https:// url), you'll need to copy here the server's certificate. For more information on this, check the Secure connections chapter. |
The keywords
project_id and bug_id are dynamically replaced by XQual when necessary.
Mantis (REST)
XQual can connect to Mantis using REST protocol (tested with Mantis 1.2.18 but should be fine with any other version supporting REST). Run XQual and open the menuSettings > Server Settings > Connectors > Bug-Tracking.
Then, select Mantis (REST) in the popup's selection combobox and set the following parameters (replace the login name, the password, the IP address and the port by your Mantis settings):
| Field | Description |
| authentication | You can authenticate to Mantis using two methods:
|
| username | Username of a full-access Mantis account able to see all the bugs you wish to retrieve For instance: admintoken |
| password | Password associated to the username For instance: token |
| url pattern | This indicates the URL to use with your Mantis instance to edit a bug. The URL must include the tag 'bug_id' that will be dynamically replaced by the id of the bug to be displayed/edited For instance: http:// 192.168.100.124/view.php?id=bug_id |
| url new bug | This indicates the URL to use with your Mantis instance to create a new bug. The URL can include the tag 'bug_description' that will be used to prepopulate the summary of the new bug The URL can include the tag 'step_to_reproduce' that will be used to prepopulate the description of the new bug For instance: http:// 192.168.100.124/bug_report_page.phpIf you wish to pre-populate your issue while executing the tests you can use a URL similar to: http:// 192.168.100.124/bug_report_page.php?project_id=project_id&summary=bug_description&description=step_to_reproduce(note that there is some limitation on size for the URL - i.e. if the URL is too large, Mantis may not populate the description field) |
| url server | This indicates the URL of your Mantis's REST server. For instance: http:// 192.168.100.124/api/rest |
| filter Projects | The list of project names separated by ';' characters When left empty, issues from all projects are retrieved. |
| filter status | The list of status that you wish to filter separated by ';' characters Note: If some status names contain special characters, you can use unicode sequences i.e. to specify status " Accepté", enter "Accept\u00e9"When left empty, issues with any status are retrieved. |
| Accept ANY TLS/SSL certificate | If you connect to your Mantis server using a SSL connection and you trust the network, just check this checkbox to accept any certificate. Note that if you do so and if your environment is not safe, you're subject to a man-in-the-middle attack. For more information on this, check the Secure connections chapter. |
| Certificate (needed only with https URL) | If you connect to your Mantis server using a SSL connection (https:// url), you'll need to copy here the server's certificate. For more information on this, check the Secure connections chapter. |
The keywords
project_id and bug_id are dynamically replaced by XQual when necessary.
Bugzilla (XML-RPC)
XQual can connect to Bugzilla's using XML-RPC protocol. Run XQual and open the menuSettings > Server Settings > Connectors > Bug-Tracking.
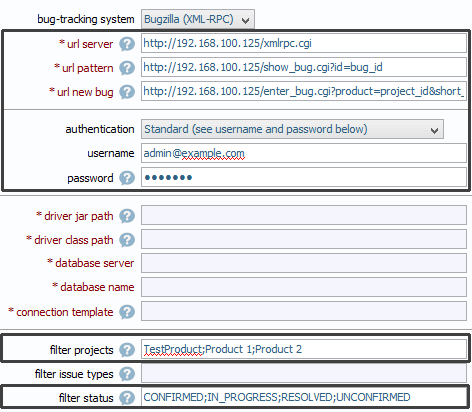
Then, select Bugzilla (XML-RPC) in the popup's selection combobox and set the following parameters (replace the login name, the password, the IP address and the port by your Mantis settings):
| Field | Description |
| authentication | You can authenticate to Bugzilla using two methods:
|
| username | Username of a full-access Bugzilla account able to see all the bugs you wish to retrieve For instance: user1 |
| password | Password associated to the username For instance: user1_password |
| url pattern | This indicates the URL to use with your Bugzilla instance to edit a bug. The URL must include the tag 'bug_id' that will be dynamically replaced by the id of the bug to be displayed/edited For instance: http:// 192.168.100.125/show_bug.cgi?id=bug_id |
| url new bug | This indicates the URL to use with your Bugzilla instance to create a new bug. The URL can include the tag 'project_id' that will be used as the default project when you create a new bug The URL can include the tag 'bug_description' that will be used to prepopulate the summary of the new bug The URL can include the tag 'step_to_reproduce' that will be used to prepopulate the description of the new bug For instance: http:// 192.168.100.125/enter_bug.cgi?product=project_idIf you wish to pre-populate your issue while executing the tests you can use a URL similar to: http:// 192.168.100.125/enter_bug.cgi?product=project_id&short_desc=bug_description&comment=step_to_reproduce(note that there is some limitation on size for the URL - i.e. if the URL is too large, Bugzilla may truncate the description field) |
| url server | This indicates the URL of your Bugzilla's XML-RPC server. For instance: http:// 192.168.100.125/xmlrpc.cgi |
| filter projects | The list of project names separated by ';' characters For instance: TestProduct;Product 1;Product 2When left empty, issues from all projects are retrieved. |
| filter status | The list of status that you wish to filter separated by ';' characters For instance: CONFIRMED;IN_PROGRESS;RESOLVED;UNCONFIRMEDWhen left empty, issues with any status are retrieved. |
| Accept ANY TLS/SSL certificate | If you connect to your Bugzilla server using a SSL connection and you trust the network, just check this checkbox to accept any certificate. Note that if you do so and if your environment is not safe, you're subject to a man-in-the-middle attack. For more information on this, check the Secure connections chapter. |
| Certificate (needed only with https URL) | If you connect to your Bugzilla server using a SSL connection (https:// url), you'll need to copy here the server's certificate. For more information on this, check the Secure connections chapter. |
The login and password provided will be used to connect via JDBC to the Bugzilla database.
Trac
You'll need to first ensure you have the XML-RPC plugin installed and activated in your trac install. Please check trac Hacks's website for more information on how to install/enable the XML-RPC plugin.Once the XML-RPC plugin is activated, run XQual and open the menu
Settings > Server Settings > Connectors > Bug-Tracking.
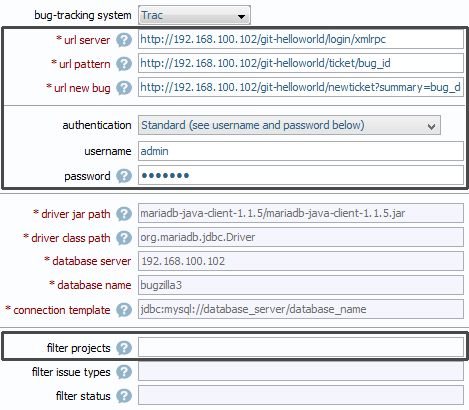
Then, select Trac in the popup's selection combobox and set the following parameters (replace the login name, the password and the IP addressby your trac settings):
| Field | Description |
| authentication | You can authenticate to trac using two methods:
|
| username | Username of a full-access trac account able to see all the bugs you wish to retrieve For instance: user1 |
| password | Password associated to the username For instance: user1_password |
| url pattern | This indicates the URL to use with your trac instance to edit a bug. The URL must include the tag 'bug_id' that will be dynamically replaced by the id of the bug to be displayed/edited For instance: http:// 192.168.10.102/example/ticket/bug_id |
| url new bug | This indicates the URL to use with your trac instance to create a new bug. The URL can include the tag 'bug_description' that will be used to prepopulate the summary of the new bug The URL can include the tag 'step_to_reproduce' that will be used to prepopulate the description of the new bug For instance: http:// 192.168.10.102/example/newticketIf you wish to pre-populate your issue while executing the tests you can use a URL similar to: http:// 192.168.10.102/example/newticket?summary=bug_description&description=step_to_reproduce(note that there is some limitation on size for the URL - i.e. if the URL is too large, Bugzilla may truncate the description field) |
| url server | This indicates the URL of your trac's XML-RPC server. For instance: http:// 192.168.10.102/example/login/xmlrpc |
| filter Projects | The list of project names separated by ';' characters For instance: Milestone1;Milestone2When left empty, issues from all projects are retrieved. |
The login and password provided will be used to authenticate to the trac XML-RPC server.
The keyword
bug_id is dyamically replaced by XQual when necessary.
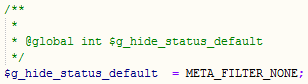
Note: If you intend to show also closed bugs in XQual, then there is a specific settings to write into Trac's configuration:
Clearquest
This connector is using OSLC standard API to access Clearquest database.Run XQual and open the menu
Settings > Server Settings > Connectors > Bug-Tracking.
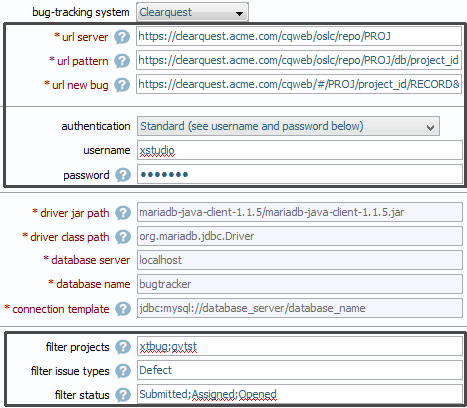
Then, select Clearquest in the popup's selection combobox and set the following parameters (replace the login name, the password, the IP address and the Repository by your Clearquest settings):
| Field | Description |
| authentication | You can authenticate to Clearquest using two methods:
|
| username | Username of a full-access Clearquest account able to see all the bugs you wish to retrieve For instance: user1 |
| password | Password associated to the username For instance: user1_password |
| url pattern | This indicates the URL to use with your Clearquest instance to edit a bug. The URL can include the tag 'project_id' that will be used as the default project when you create a new bug The URL must include the tag 'bug_id' that will be dynamically replaced by the id of the bug to be displayed/edited For instance: https:// 192.168.100.115/cqweb/oslc/repo/example/db/project_id/record/bug_id |
| url new bug | This indicates the URL to use with your Clearquest instance to create a new bug. The URL can include the tag 'project_id' that will be used as the default project when you create a new bug For instance: https:// 192.168.100.115/cqweb/#/example/project_id/RECORD&autoSave\=false&fieldsXml\=&noframes\=true&format\=HTML&recordType\=Defect |
| url server | This indicates the URL of your Clearquest's OSLC server. For instance: https:// 192.168.100.115/cqweb/oslc/repo/example |
| filter Projects | The list of project names separated by ';' characters For instance: Project1;Project2When left empty, issues from all projects are retrieved. |
| filter issue types | The list of issue types that you wish to retrieve in the tree separated by ';' characters For instance: DefectWhen left empty, issues with any type are retrieved. |
| filter status | The list of status that you wish to filter separated by ';' characters For instance: Submitted;Assigned;OpenedWhen left empty, issues with any status are retrieved. |
| Accept ANY TLS/SSL certificate | If you connect to your Clearquest server using a SSL connection and you trust the network, just check this checkbox to accept any certificate. Note that if you do so and if your environment is not safe, you're subject to a man-in-the-middle attack. For more information on this, check the Secure connections chapter. |
| Certificate (needed only with https URL) | If you connect to your Clearquest server using a SSL connection (https:// url), you'll need to copy here the server's certificate. For more information on this, check the Secure connections chapter. |
The login and password provided will be used to authenticate to the Clearquest server.
The keywords
project_id and bug_id are dyamically replaced by XQual when necessary.
VersionOne
This connector is using a standard REST API to access VersionOne data.run XQual and open the menu
Settings > Server Settings > Connectors > Bug-Tracking.
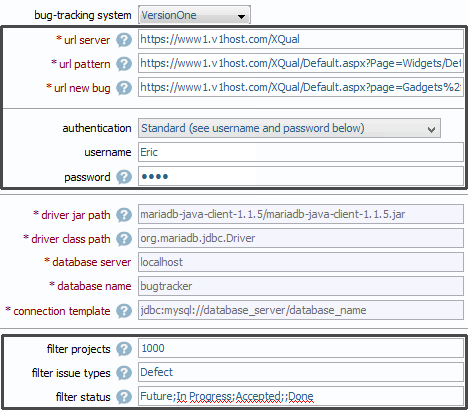
Then, select VersionOne in the popup's selection combobox and set the following parameters (replace the login name, the password, the IP address and the Repository by your VersionOne settings):
| Field | Description |
| authentication | You can authenticate to VersionOne using two methods:
|
| username | Username of a full-access VersionOne account able to see all the defects you wish to retrieve For instance: user1 |
| password | Password associated to the username For instance: user1_password |
| url pattern | This indicates the URL to use with your VersionOne instance to edit a bug. The URL must include the tag 'bug_id' that will be dynamically replaced by the id of the bug to be displayed/edited For instance: https:// www1.v1host.com/Acme/Default.aspx?Page=Widgets/Details/QuickEditStory&AssetContext=Story\:bug_id
|
| url new bug | This indicates the URL to use with your VersionOne instance to create a new bug. For instance: https:// www1.v1host.com/Acme/Default.aspx?page=Gadgets/AddNewAsset/DropDown/Controls/AddDefect
|
| url server | This indicates the URL of your VersionOne's server. For instance: https:// www1.v1host.com/Acme |
| filter Projects | The list of project ids separated by ';' characters For instance: 1000;1001When left empty, issues from all projects are retrieved. |
| filter issue types | The list of issue types that you wish to retrieve in the tree separated by ';' characters For instance: DefectWhen left empty, issues with any type are retrieved. |
| filter status | The list of status that you wish to filter separated by ';' characters For instance: Future;In Progress;Accepted;;DoneWhen left empty, issues with any status are retrieved. |
| Accept ANY TLS/SSL certificate | If you connect to your VersionOne server using a SSL connection and you trust the network, just check this checkbox to accept any certificate. Note that if you do so and if your environment is not safe, you're subject to a man-in-the-middle attack. For more information on this, check the Secure connections chapter. |
| Certificate (needed only with https URL) | If you connect to your VersionOne server using a SSL connection (https:// url), you'll need to copy here the server's certificate. For more information on this, check the Secure connections chapter. |
The login and password provided will be used to authenticate to the VersionOne server.
The keywords
project_id and bug_id are dyamically replaced by XQual when necessary.
Redmine (REST)
This connector is using a standard REST API to access Redmine data.run XQual and open the menu
Settings > Server Settings > Connectors > Bug-Tracking.
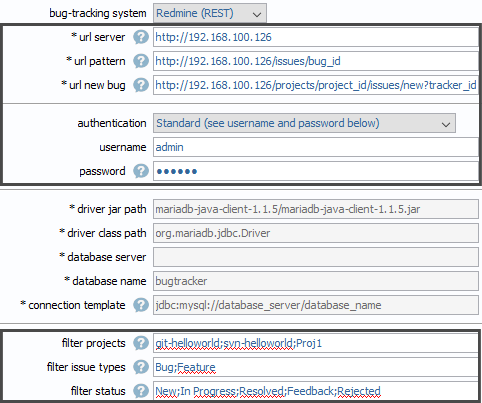
Then, select Redmine in the popup's selection combobox and set the following parameters (replace the login name, the password, the IP address and the Repository by your Redmine settings):
| Field | Description |
| authentication | You can authenticate to Redmine using two methods:
|
| username | Username of a full-access Redmine account able to see all the defects you wish to retrieve For instance: user1 |
| password | Password associated to the username For instance: user1_password |
| url pattern | This indicates the URL to use with your Redmine instance to edit a bug. The URL must include the tag 'bug_id' that will be dynamically replaced by the id of the bug to be displayed/edited For instance: https:// 192.168.100.126/issues/bug_id
|
| url new bug | This indicates the URL to use with your Redmine instance to create a new bug. For instance: https:// 192.168.100.126/projects/project_id/issues/new?tracker_id=1
|
| url server | This indicates the URL of your Redmine's server. For instance: https:// 192.168.100.126 |
| filter Projects | The list of project ids separated by ';' characters For instance: Proj1;Proj2When left empty, issues from all projects are retrieved. |
| filter issue types | The list of issue types that you wish to retrieve in the tree separated by ';' characters For instance: Bug;FeatureWhen left empty, issues with any type are retrieved. |
| filter status | The list of status that you wish to filter separated by ';' characters For instance: New;In Progress;Resolved;Feedback;RejectedWhen left empty, issues with any status are retrieved. |
| Accept ANY TLS/SSL certificate | If you connect to your Redmine server using a SSL connection and you trust the network, just check this checkbox to accept any certificate. Note that if you do so and if your environment is not safe, you're subject to a man-in-the-middle attack. For more information on this, check the Secure connections chapter. |
| Certificate (needed only with https URL) | If you connect to your Redmine server using a SSL connection (https:// url), you'll need to copy here the server's certificate. For more information on this, check the Secure connections chapter. |
The login and password provided will be used to authenticate to the Redmine server.
The keywords
project_id and bug_id are dyamically replaced by XQual when necessary.
YouTrack
This connector is using a standard REST API to access YouTrack data.run XQual and open the menu
Settings > Server Settings > Connectors > Bug-Tracking.
Then, select YouTrack in the popup's selection combobox and set the following parameters (replace the login name, the password, the IP address and the Repository by your YouTrack settings):
| Field | Description |
| authentication | You can authenticate to YouTrack using two methods:
|
| username | Username of a full-access YouTrack account able to see all the defects you wish to retrieve For instance: user1 |
| password | Password associated to the username For instance: user1_password |
| url pattern | This indicates the URL to use with your YouTrack instance to edit a bug. The URL must include the tag 'bug_id' that will be dynamically replaced by the id of the bug to be displayed/edited For instance: https://acme.myjetbrains.com/youtrack/issue/bug_id |
| url new bug | This indicates the URL to use with your YouTrack instance to create a new bug. For instance: https://acme.myjetbrains.com/youtrack/newIssue?project=project_id&c=Type%20Task&summary=bug_description&description=step_to_reproduce |
| url server | This indicates the URL of your YouTrack's server. For instance: https://acme.myjetbrains.com/youtrack/api |
| filter Projects | The list of project ids separated by ';' characters For instance: DEMOWhen left empty, issues from all projects are retrieved. |
| filter issue types | The list of issue types that you wish to retrieve in the tree separated by ';' characters For instance: Bug;Epic;Feature;TaskWhen left empty, issues with any type are retrieved. |
| filter status | The list of status that you wish to filter separated by ';' characters When left empty, issues with any status are retrieved. |
| Accept ANY TLS/SSL certificate | If you connect to your YouTrack server using a SSL connection and you trust the network, just check this checkbox to accept any certificate. Note that if you do so and if your environment is not safe, you're subject to a man-in-the-middle attack. For more information on this, check the Secure connections chapter. |
| Certificate (needed only with https URL) | If you connect to your YouTrack server using a SSL connection (https:// url), you'll need to copy here the server's certificate. For more information on this, check the Secure connections chapter. |
The login and password provided will be used to authenticate to the YouTrack server.
The keywords
project_id and bug_id are dynamically replaced by XQual when necessary.
Both-way integration
Jira
If you configured XQual as described above, you have what we call a single-way integration with Jira.This means that:
- you can see all the Jira issues in XQual's Requirements and/or Bugs trees
- you can see all the Jira issues linked with XQual items in XQual's GUI
- you can create/update Jira issues from XQual:
- either asynchronously (redirecting to Jira appropriate URL)
- or synchronously (using integrated GUI)
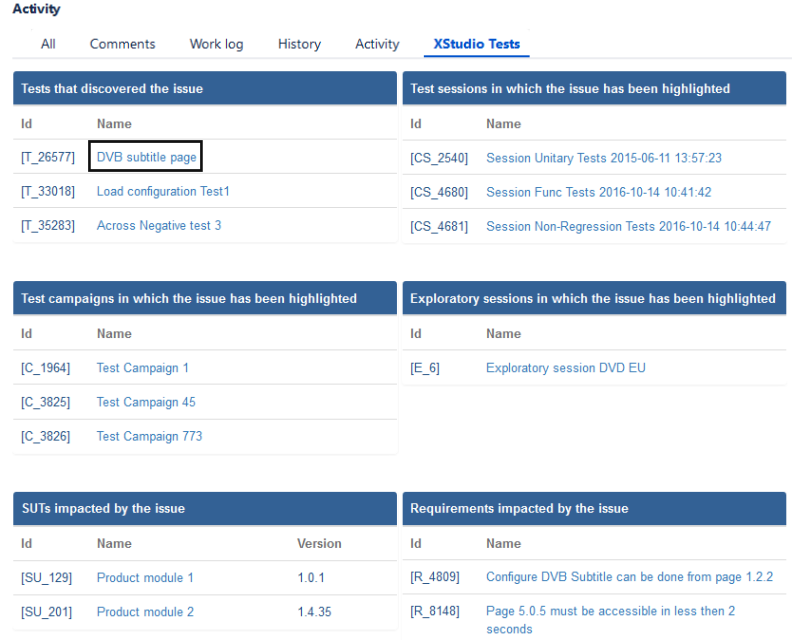
In addition to this, if you want to view/access XQual items linked with your Jira issues from Jira, then you'll need to install our Jira app on your Jira. This is an easy setup as you'll see in the procedure below.
Benefits
When our Jira app is installed on your Jira instance, you'll get an additional XQual Tests tab in the Activity section of each issue.For bugs, the panel in this new tab includes 6 sections showing:
- All the Tests that detected the selected issue
- All the Test Campaigns that detected the selected issue
- All the Sessions (campaign's execution instances) in which the selected issue has been observed
- All the Exploratory Sessions where the selected issue has been observed
- All the SUTs impacted by this issue
- All the Requirements impacted by this issue
For requirements, the panel will include 3 sections showing:
- All the SUTs covered by the selected issue
- All the Tests verifying the selected issue
- All the Bugs that are impacting the selected issue
All the items are clickable and redirect the user to the item in XQual.
Compatibility matrix
You need to know which version of our Jira app is appropriate for you.Indeed, it will depends from which type of Jira (Jira Server or Jira Cloud) and which version of XQual you're using.
There have been many changes in Atlassian strategy, APIs and recommended frameworks so the following must be read carefully.
Breaking News: Atlassian has just announced they stop selling Jira Server license, hence we've decided to not maintain anymore our Jira app for Jira Server. It is still available but we do not support it anymore.
As a result, here are the options you have:
| XQual Versions | ||
| <= 4.1sp10 | >= 4.1sp11 | |
| Jira Cloud (Atlassian's Connect API) |
Not Supported (Atlassian deprecation) |
Three ways to install it: - From the Atlassian Marketplace (using our public Connect app server) - Manually - with your own private Connect app server (Download) - Manually - with our public Connect app server |
| Jira Server & Jira Data-center (Atlassian's legacy API) |
Not maintained anymore as Atlassian stopped Jira Server. However, you can still install the old legacy version if you wish. Two ways to install it: - From the Atlassian Marketplace - Manually (Download) |
Not maintained anymore as Atlassian stopped Jira Server. Not Supported |
Install from Atlassian Marketplace our Jira Connect app
XQual's Jira Connect app is available directly in the Atlassian Marketplace: XQual Integration for Jira Cloud.Atlassian also provides an Installation section.
- Log into your Jira instance as an admin
- Open the Apps menu and select Manage your apps
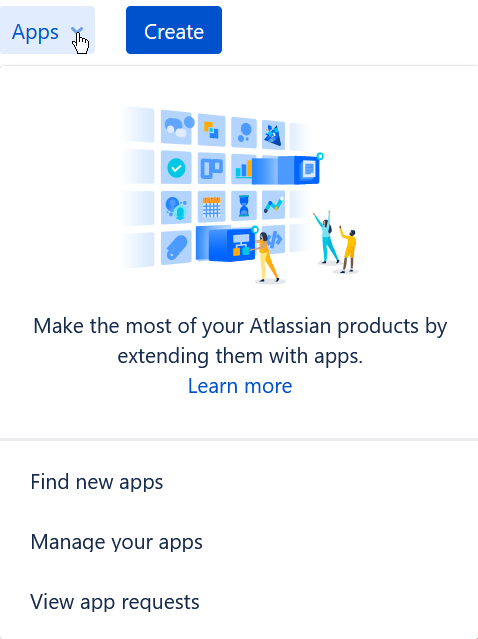
- Click Find new apps from the left-hand side of the page
- Search for "XQual"
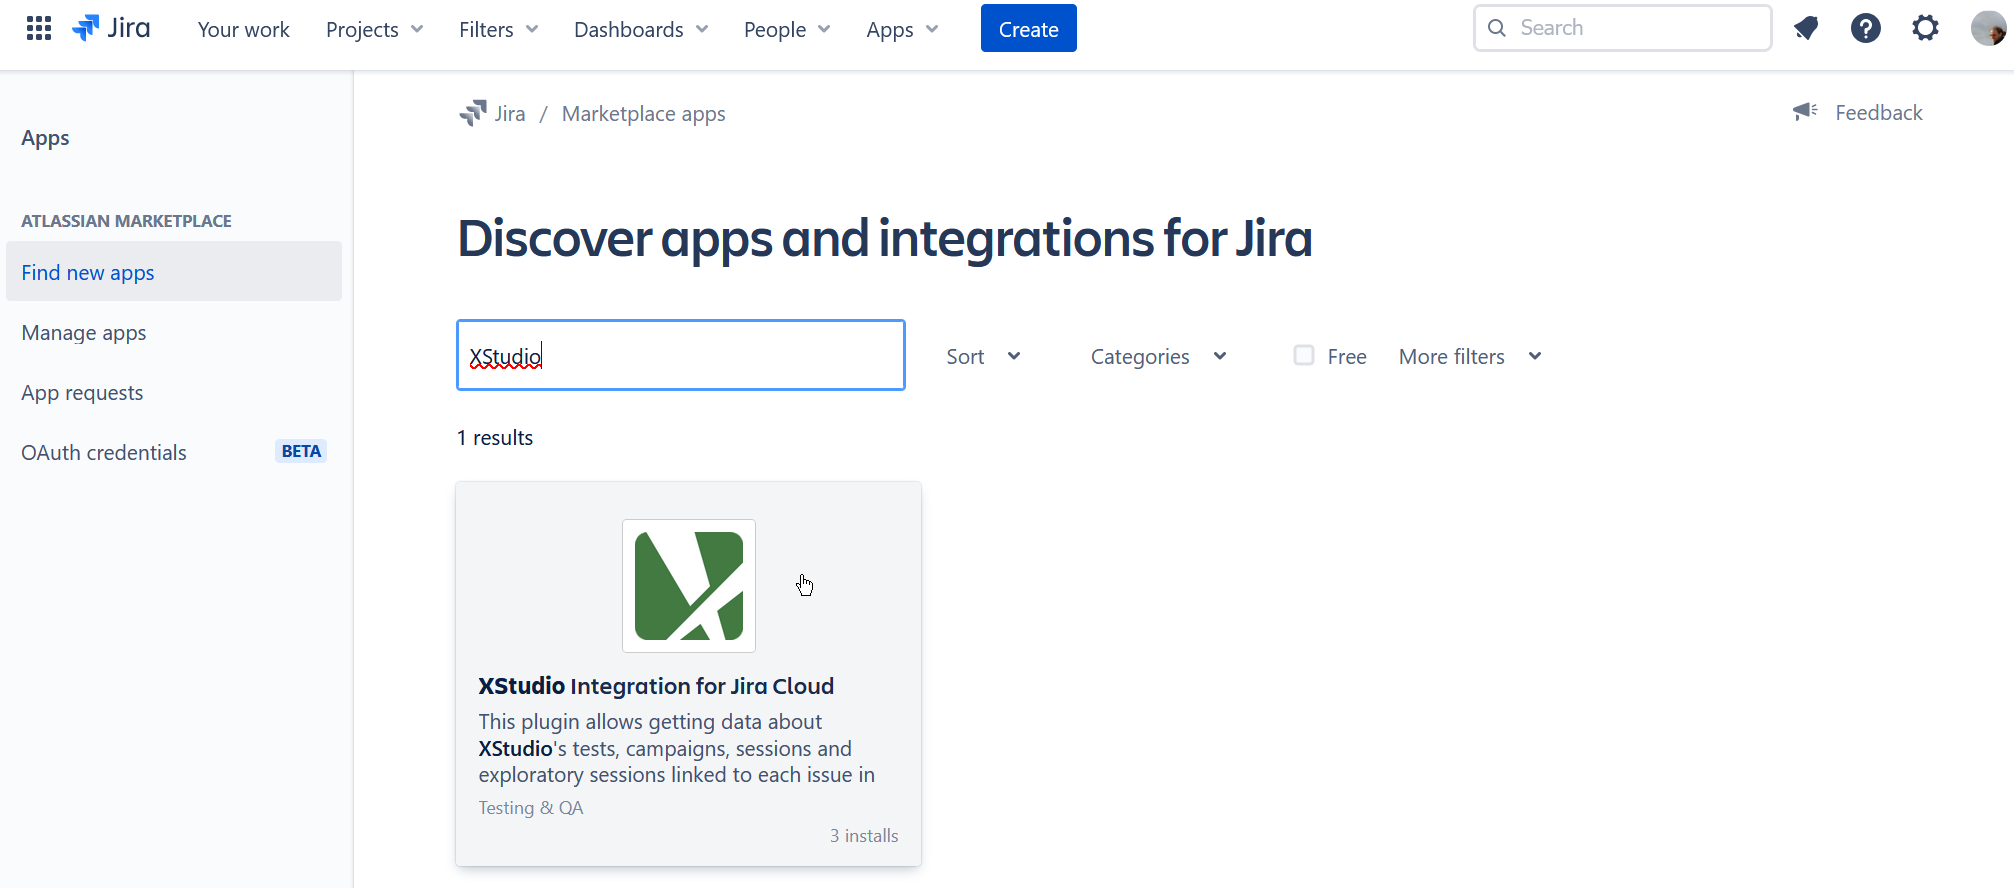
- Select XQual integration for Jira Cloud and click Get app
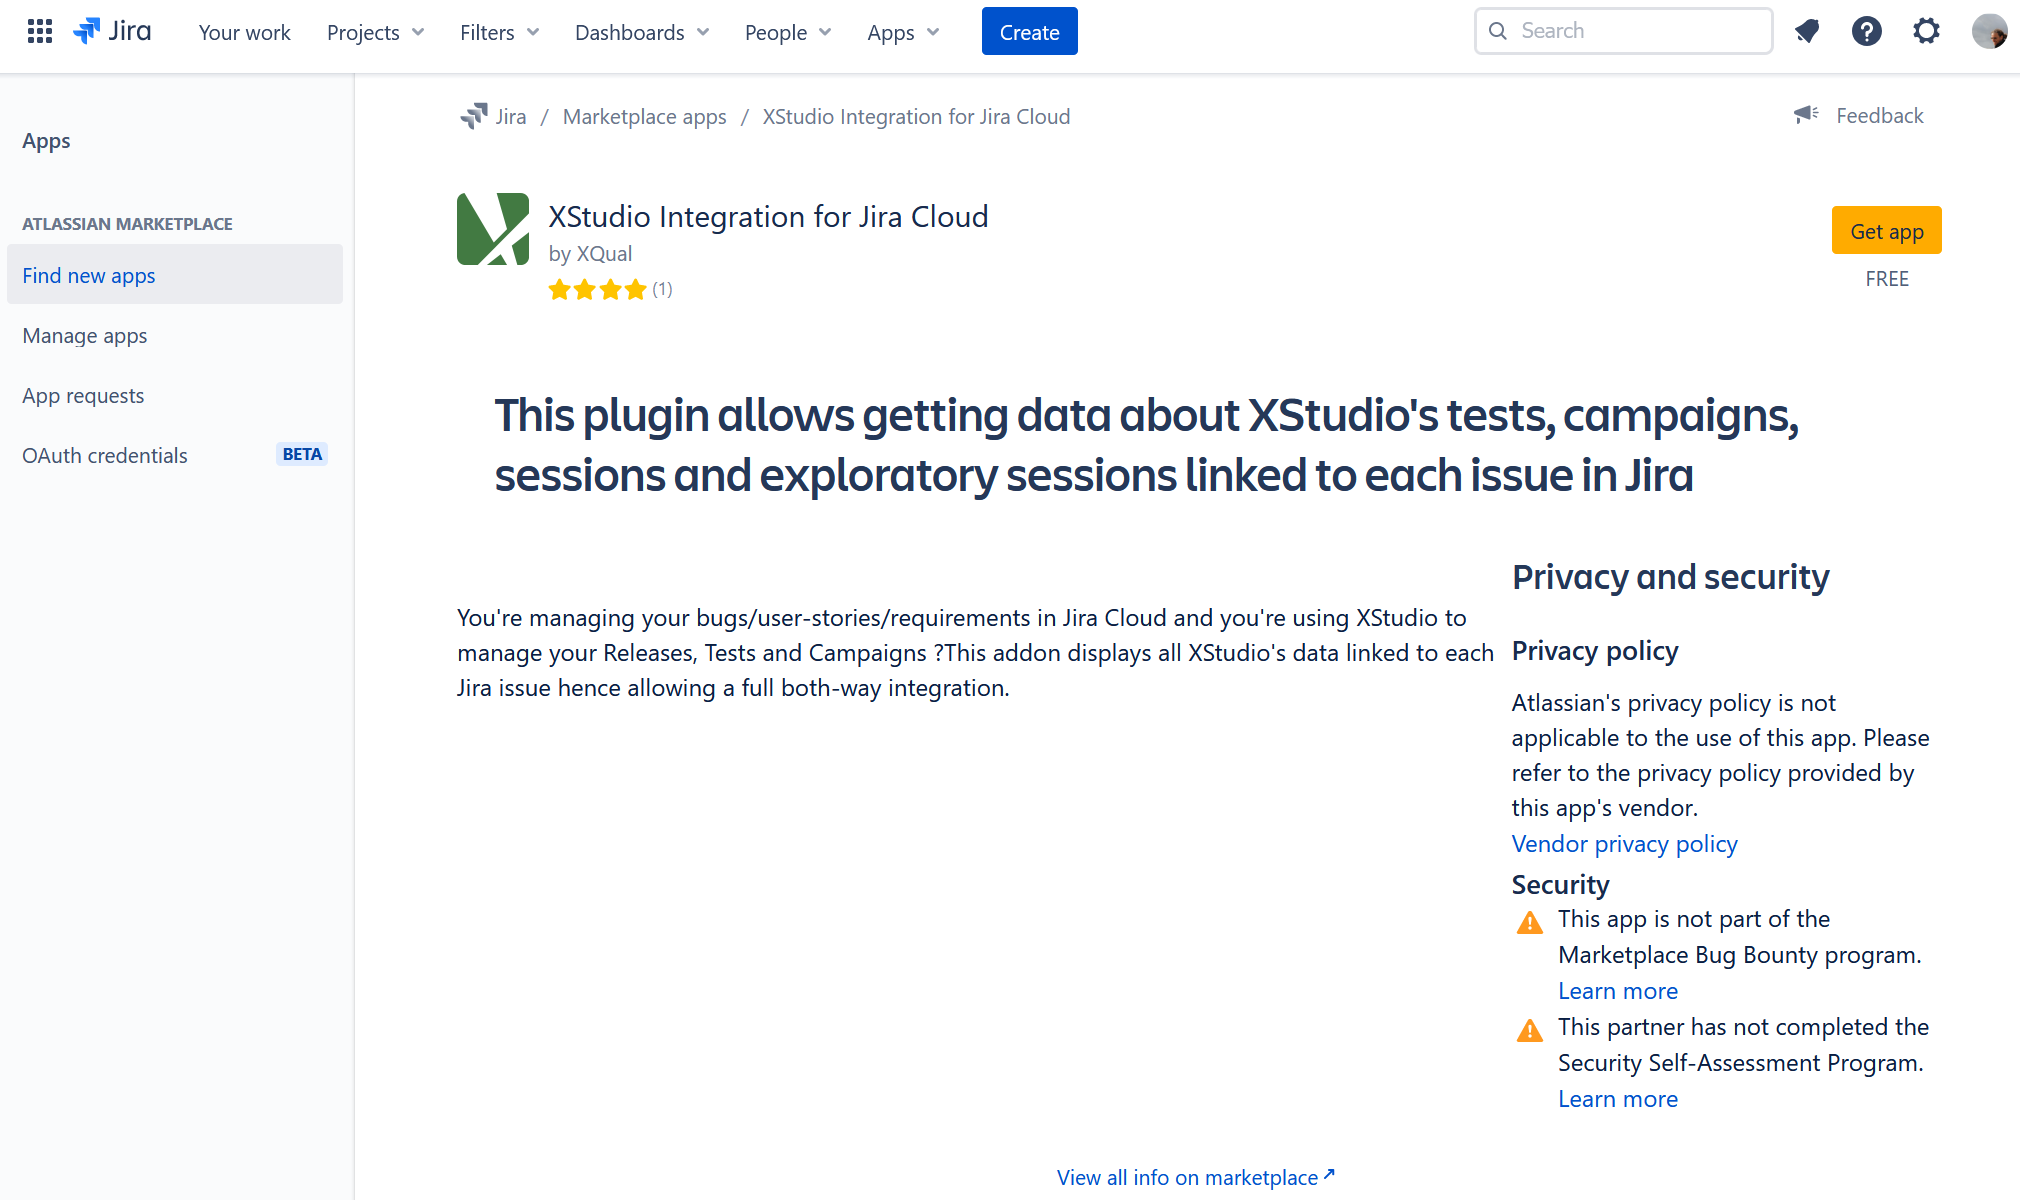
- Confirm the installation by clicking on Get it now
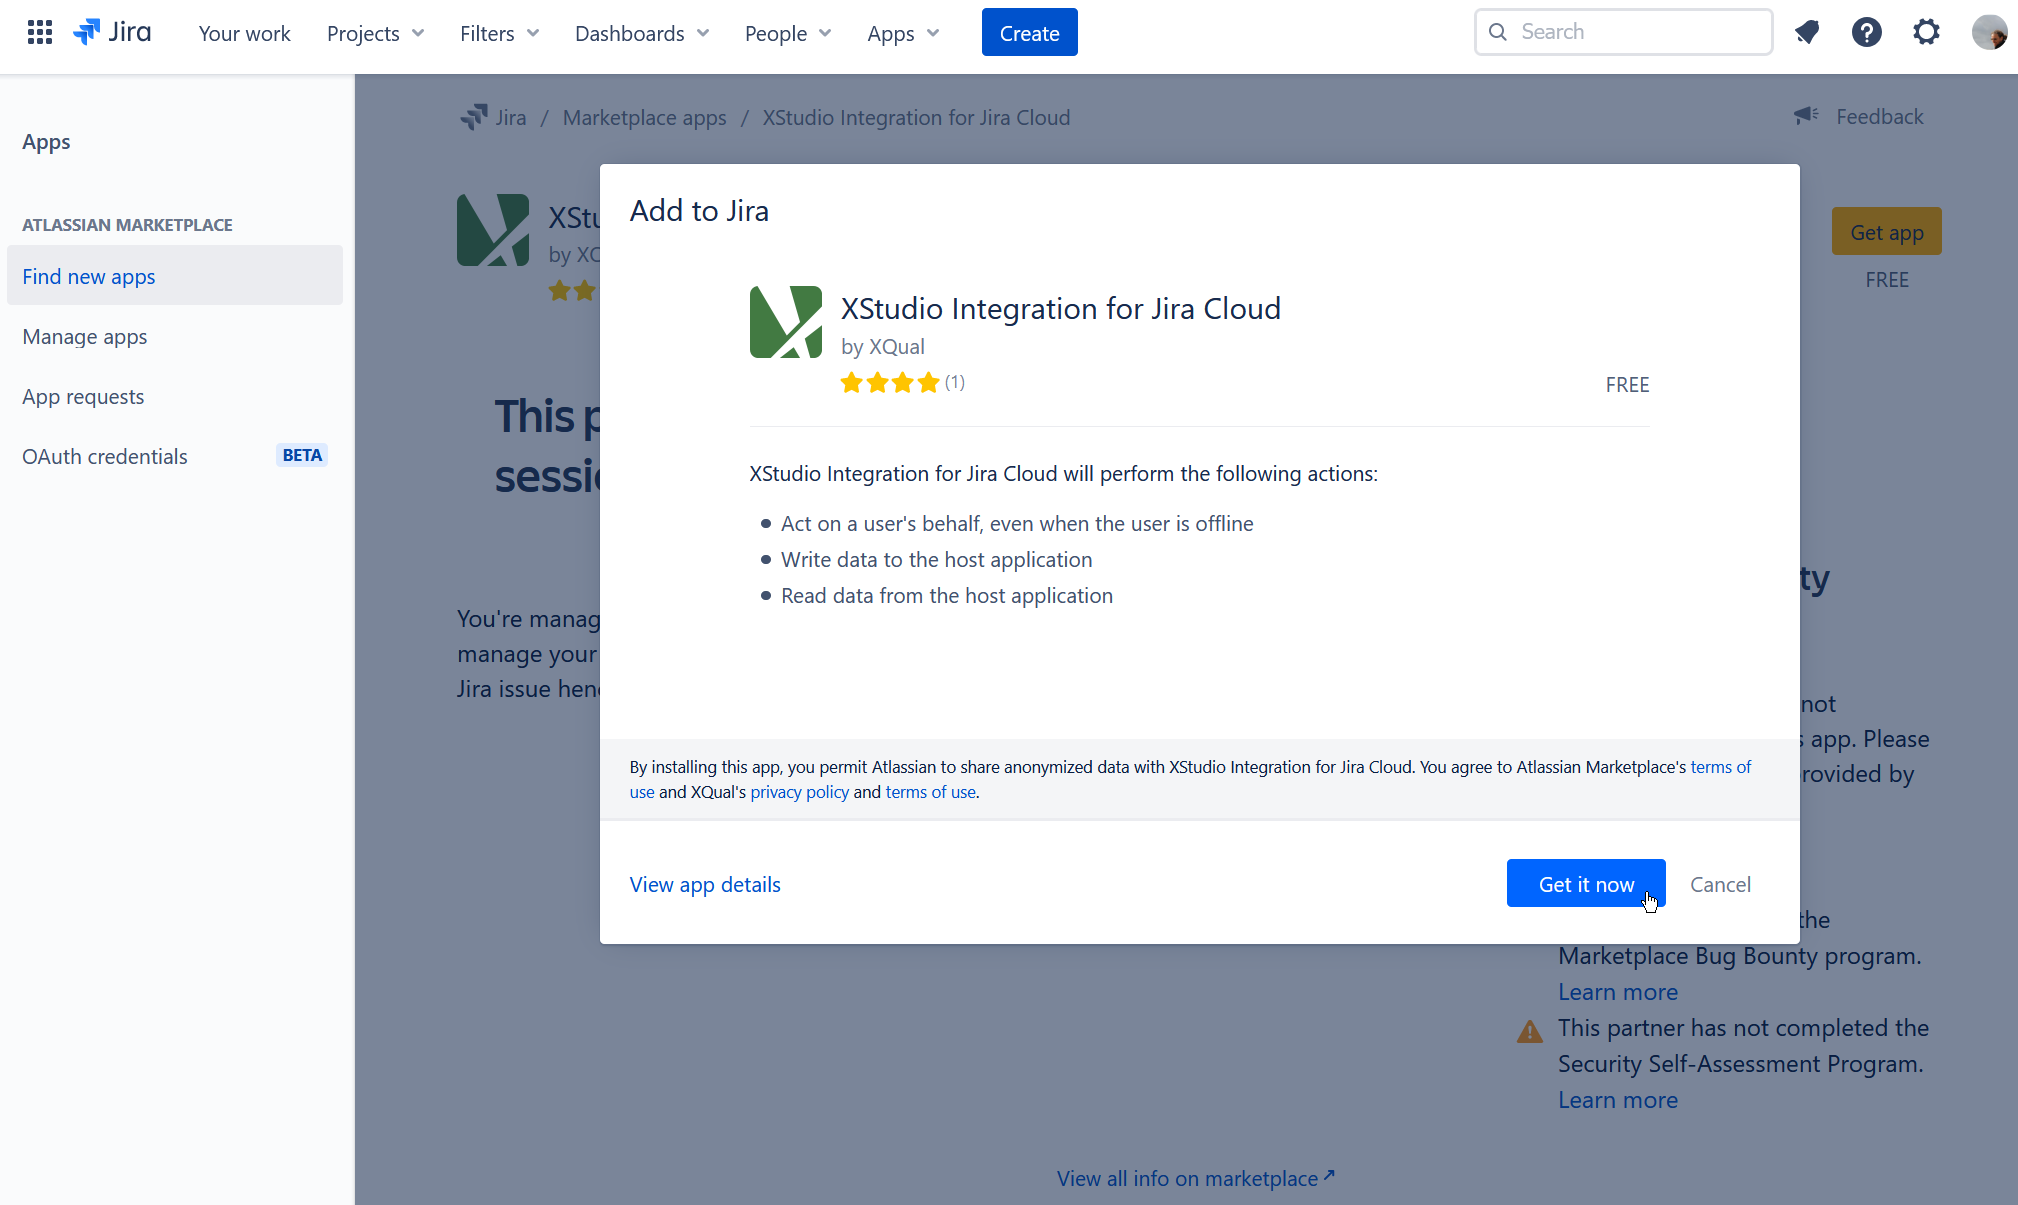
- After a few seconds, the XQual integration for Jira Cloud app is confirmed to be installed
- Click Manage apps from the left-hand side of the page and select XQual integration for Jira Cloud
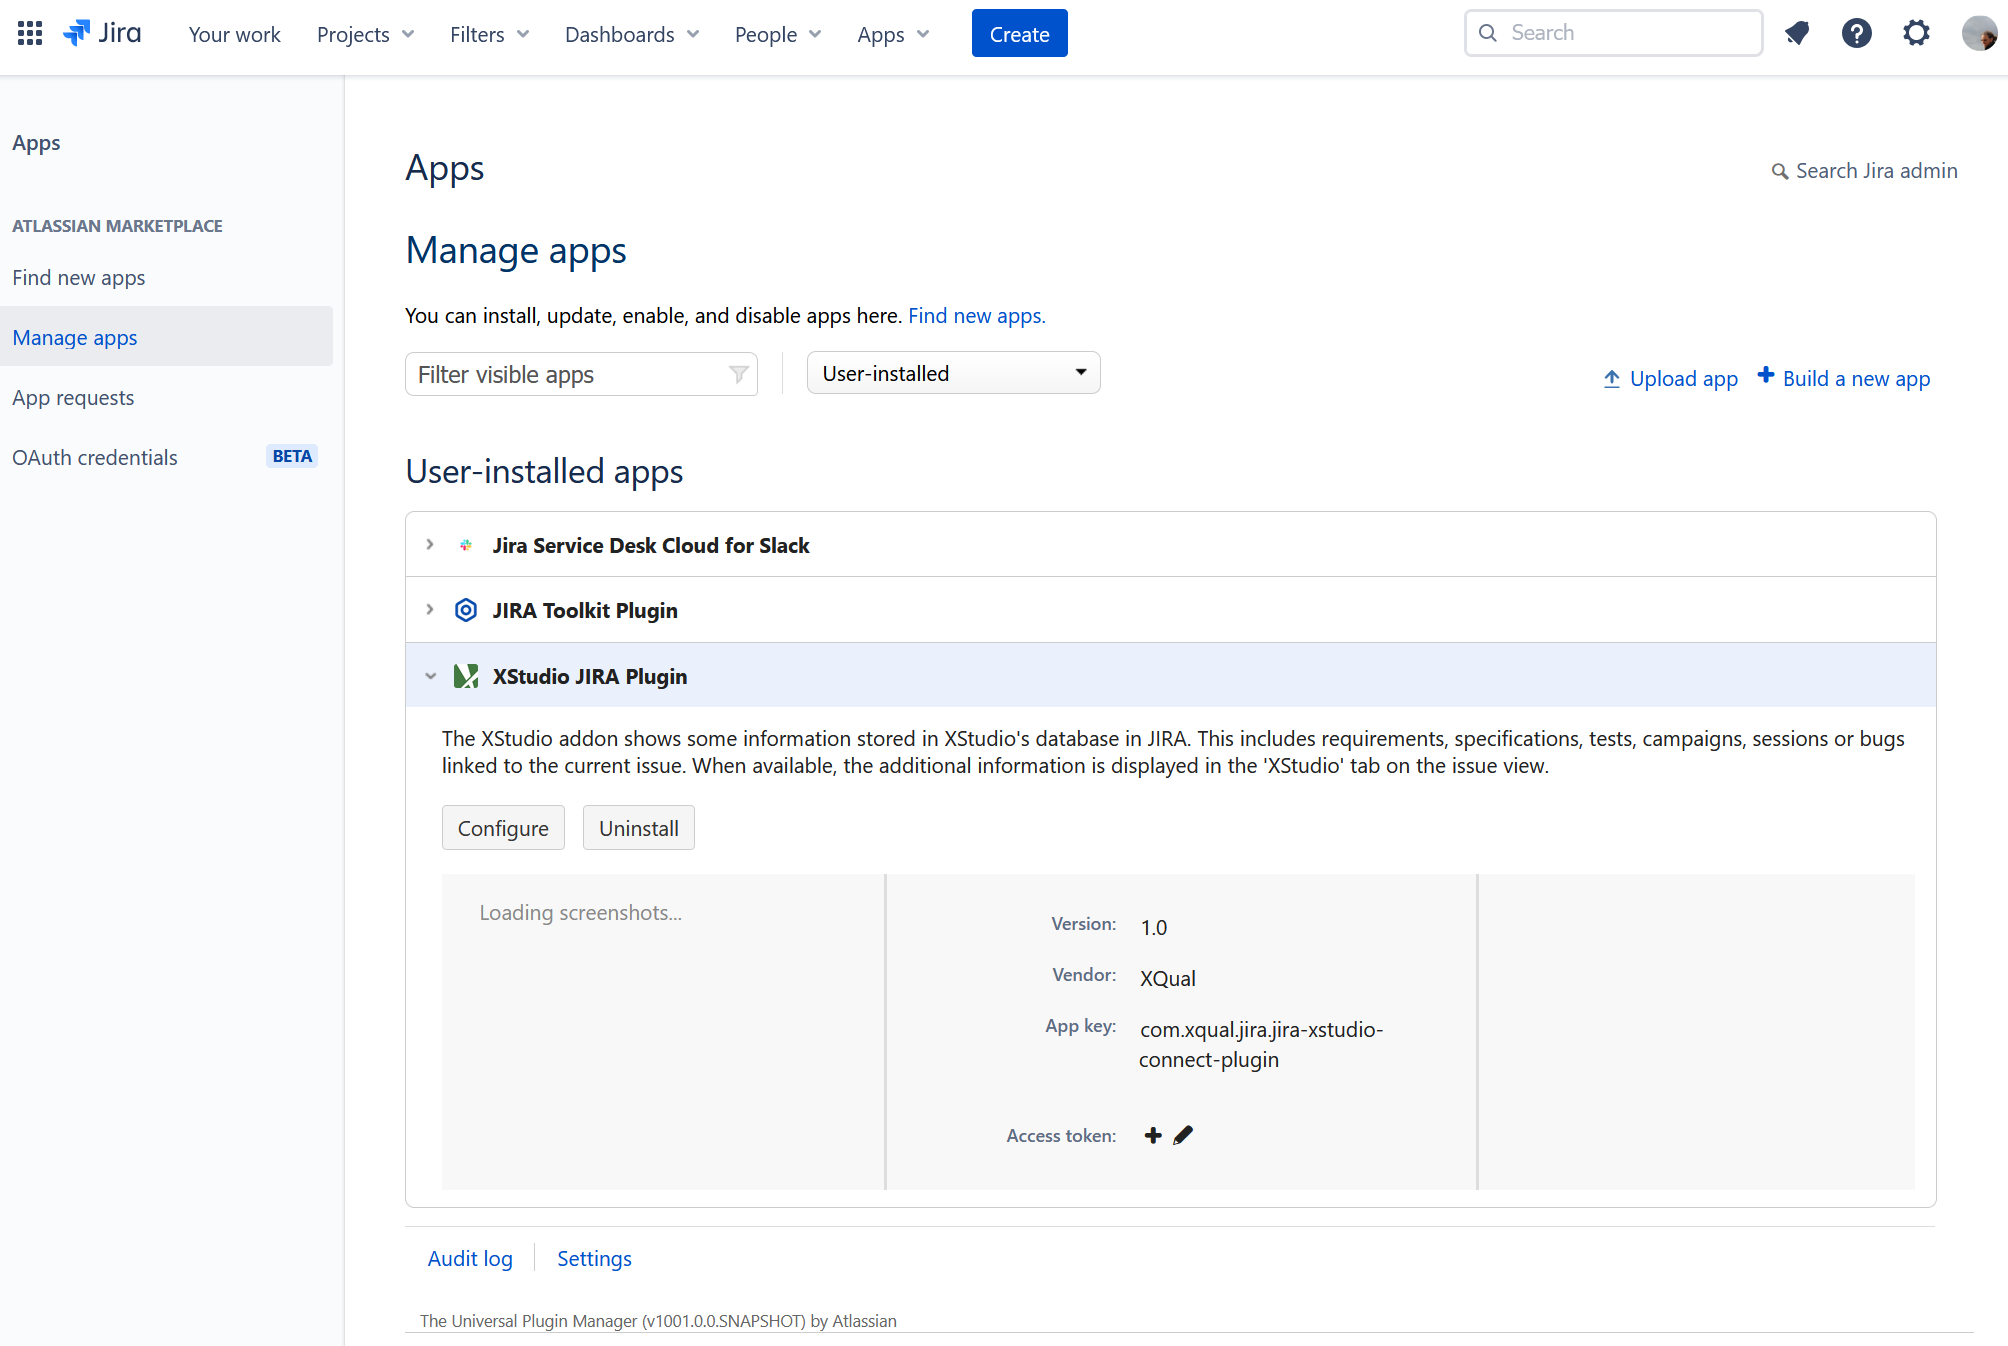
- Click on Configure
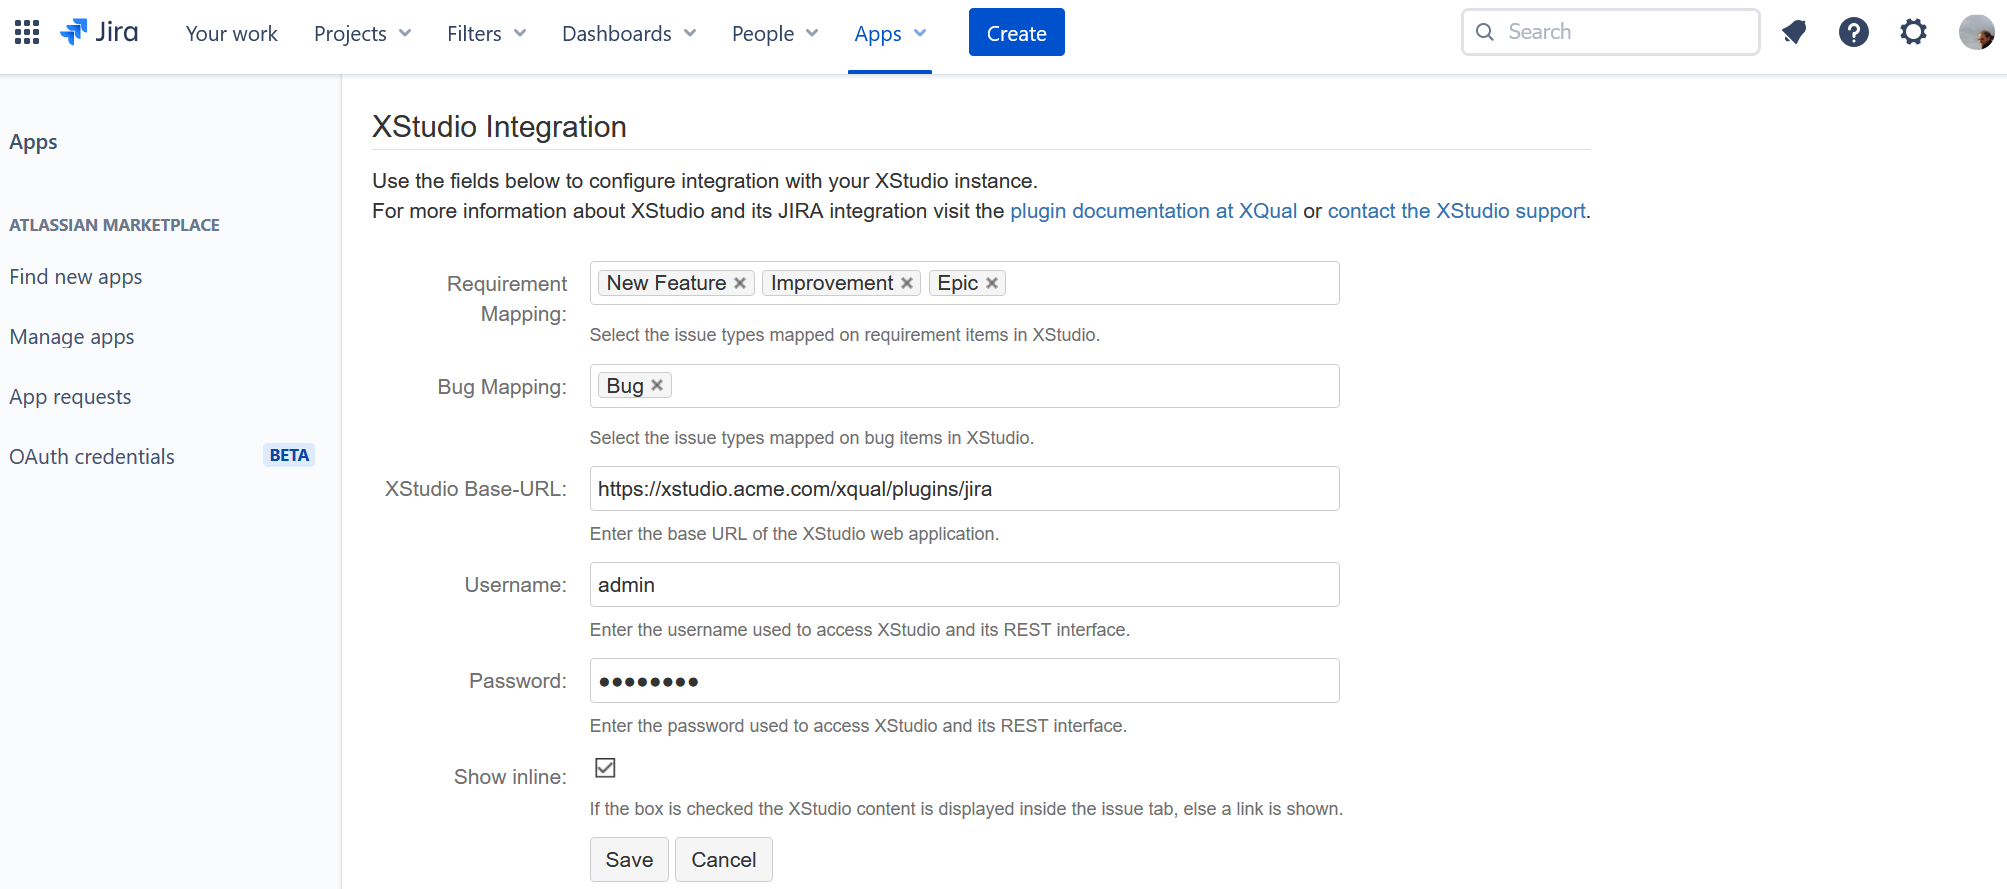
The configuration panel must be provided with the following information:
Field Description Requirement Mapping Which issue types in Jira are considered as requirements in XQual.
For instance,New Feature,ImprovementandEpicBug Mapping Which issue types in Jira are considered as bugs in XQual.
For instance,BugXQual Base-URL The URL of the XQual's Jira app front-end.
If you're using XQual on premises:
https://<your xstudio domain>/xqual/plugins/jira
More specifically, if you're using XQual Cloud:
https://<company-name>-prod1.myxqual.com/xqual/plugins/jiraUsername the username used to fetch data from the XQual (this account must exists in XQual) Password The password corresponding to the username above Show inline If ticked, all the data will be displayed embedded in Jira's interface (for security reasons, it requires a XQual https URL though).
If not ticked, a separate page is opened in the browser
Install manually our Jira Connect app
If you want to install our Jira Connect app manually, you need to use a Connect app server. You can either host it yourself (for more control) or use our global public server.Install your own private Connect app server
- Download the latest version of the Jira Connect App Server from our download section
- Remember the version that you downloaded (i.e. "8")
- Create a directory jira-xstudio-connect-plugin-<version> under the webapps folder on your XQual server
- Unzip the package
- Copy the content in the newly created folder jira-xstudio-connect-plugin-<version> on your XQual server
- You need to configure your Tomcat so that it match Atlassian requirements in terms of security.
Only TLSv1.2 should be enabled (TLSv1.0 and TLSv1.1 must be forbidden)
Check your Tomcat's documentation for more details. Most of the time, you'll just need to add in your Tomcat's 8443 connector (in server.xml) something similar to:
			<Connector protocol="org.apache.coyote.http11.Http11NioProtocol"

			    port="8443" maxThreads="150"

			    scheme="https" secure="true" SSLEnabled="true"

			    keystoreFile="your_jks_file_path"

			    keystorePass="you_keystore_password"

			    clientAuth="false"

			    sslProtocol="TLSv1.2"

			    sslEnabledProtocols="TLSv1.2"

			    useServerCipherSuitesOrder="true"

			    ciphers="TLS_ECDHE_RSA_WITH_AES_128_GCM_SHA256,TLS_ECDHE_RSA_WITH_AES_256_GCM_SHA384,TLS_DHE_RSA_WITH_AES_128_GCM_SHA256,TLS_DHE_RSA_WITH_AES_256_GCM_SHA384,TLS_ECDHE_RSA_WITH_AES_128_CBC_SHA256,TLS_ECDHE_RSA_WITH_AES_128_CBC_SHA,TLS_ECDHE_RSA_WITH_AES_256_CBC_SHA384,TLS_ECDHE_RSA_WITH_AES_256_CBC_SHA,TLS_DHE_RSA_WITH_AES_128_CBC_SHA256,TLS_DHE_RSA_WITH_AES_128_CBC_SHA,TLS_DHE_RSA_WITH_AES_256_CBC_SHA256,TLS_DHE_RSA_WITH_AES_256_CBC_SHA,TLS_RSA_WITH_AES_128_GCM_SHA256,TLS_RSA_WITH_AES_256_GCM_SHA384,TLS_RSA_WITH_AES_128_CBC_SHA256,TLS_RSA_WITH_AES_256_CBC_SHA256,TLS_RSA_WITH_AES_128_CBC_SHA,TLS_RSA_WITH_AES_256_CBC_SHA,SSL_RSA_WITH_3DES_EDE_CBC_SHA">

			</Connector>
HSTS should be enabled and X-Frame-Options should be authorized
Check your Tomcat's documentation for more details. Most of the time, you'll just need to add a new filter in your Tomcat's web.xml similar to:
			<filter>

			  <filter-name>httpHeaderSecurity</filter-name>

			  <filter-class>org.apache.catalina.filters.HttpHeaderSecurityFilter</filter-class>

			  <async-supported>true</async-supported>

			  <init-param>

			    <param-name>hstsEnabled</param-name>

			    <param-value>true</param-value>

			  </init-param>

			  <init-param>

			    <param-name>hstsMaxAgeSeconds</param-name>

			    <param-value>31536000</param-value>

			  </init-param>

			  <init-param>

			    <param-name>hstsIncludeSubDomains</param-name>

			    <param-value>true</param-value>

			  </init-param>

			  <init-param>

			    <param-name>antiClickJackingEnabled</param-name>

			    <param-value>false</param-value>

			  </init-param>

			</filter>

			<filter-mapping>

			  <filter-name>httpHeaderSecurity</filter-name>

			  <url-pattern>/*</url-pattern>

			  <dispatcher>REQUEST</dispatcher>

			</filter-mapping>
- Restart Tomcat (for this specific service, you must use a Tomcat version >= 8.5, ideally 9)
- Your XQual server should look like this:
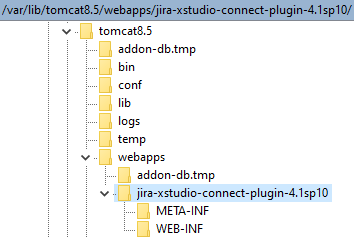
<your xstudio server>/jira-xstudio-connect-plugin-<version>/atlassian-connect.json
You should get a atlassian-connect.json file (probably just displayed in the page by your browser). Check this file contains correct path to this service.
Use our public Connect app server
You have nothing to do in this case.Just check the service is up and running by browsing this url:
https://xqual-plugin-prod1.myxqual.com/jira-xstudio-connect-plugin-<version>/atlassian-connect.json.
i.e. https://xqual-plugin-prod1.myxqual.com/jira-xstudio-connect-plugin-<version>/atlassian-connect.json
You should get a atlassian-connect.json file (probably just displayed in the page by your browser). Check this file contains correct path to this service.
Installation
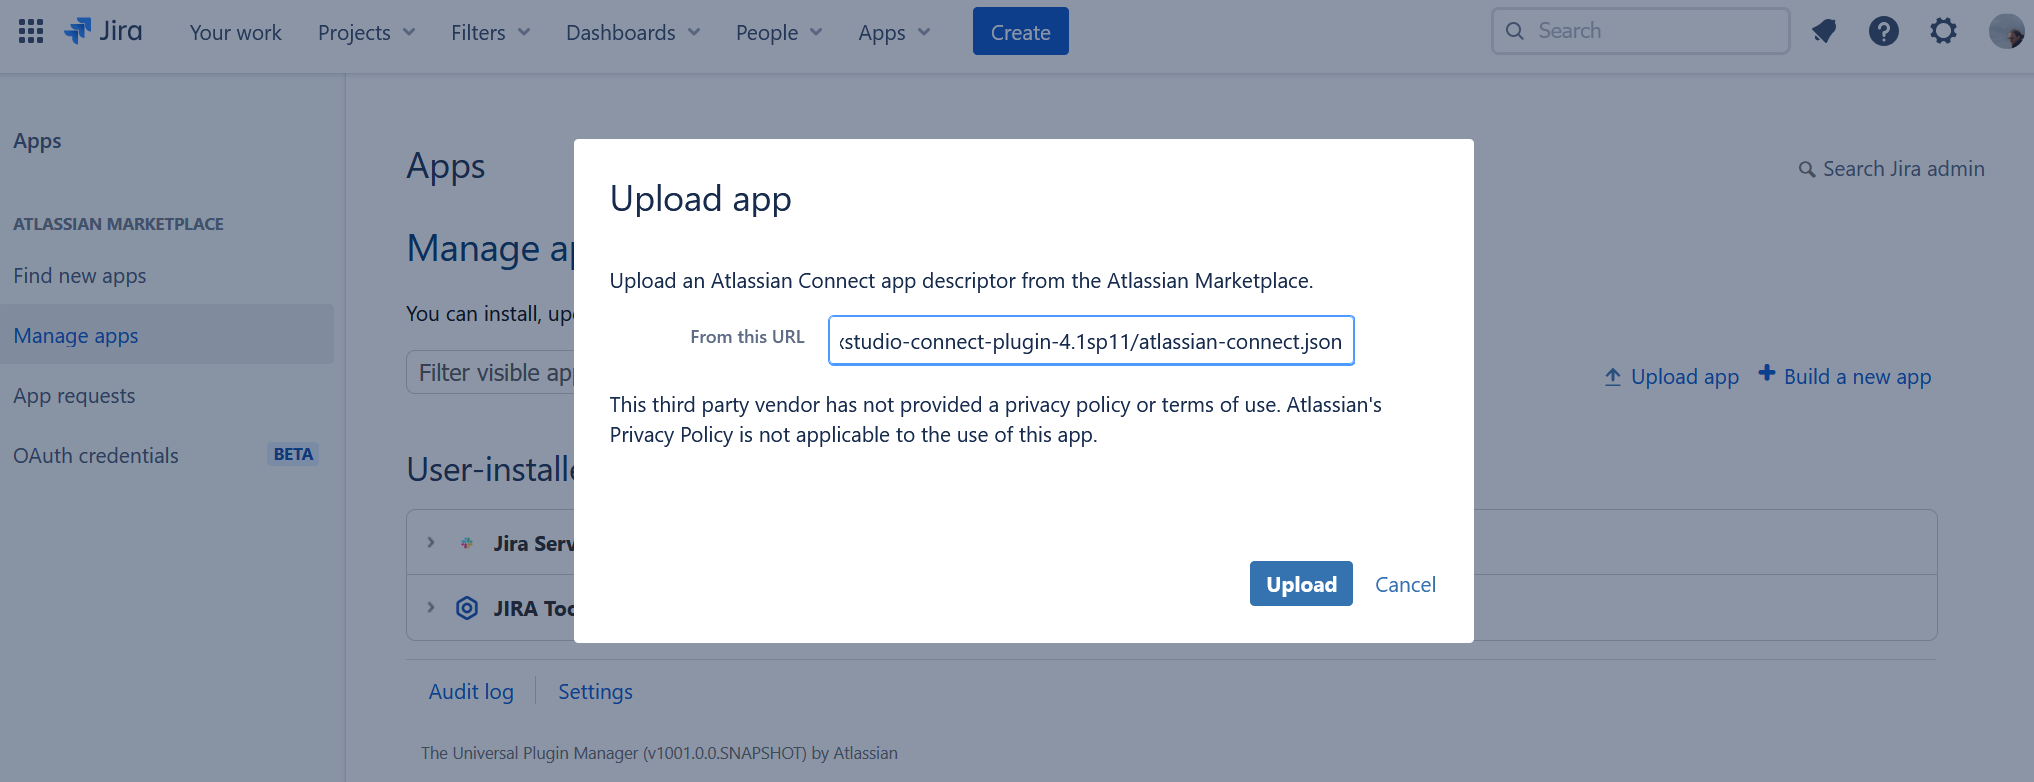
- Log into your Jira instance as an admin
- Open the Apps menu and select Manage your apps
- Click on the Upload app link
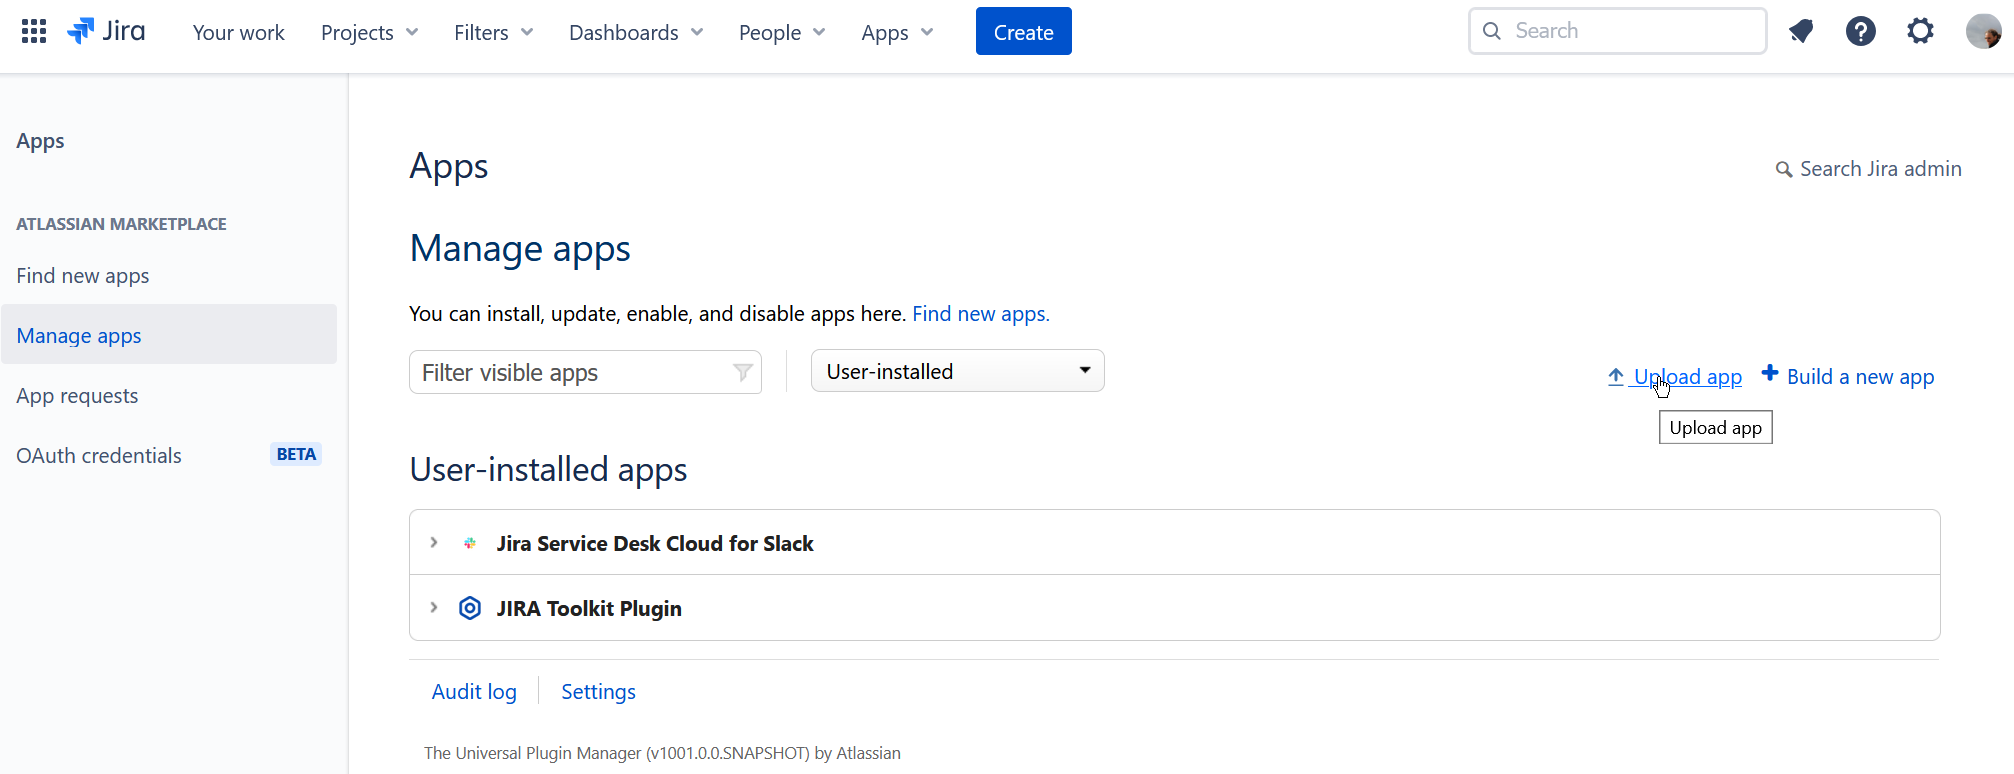
- Provide the URL to the atlassian-connect.json file (served by the Connect App server we talked about above)
i.e. https://xqual-plugin-prod1.myxqual.com/jira-xstudio-connect-plugin-<version>/atlassian-connect.json
- After a few seconds, the XQual integration for Jira Cloud app is confirmed to be installed
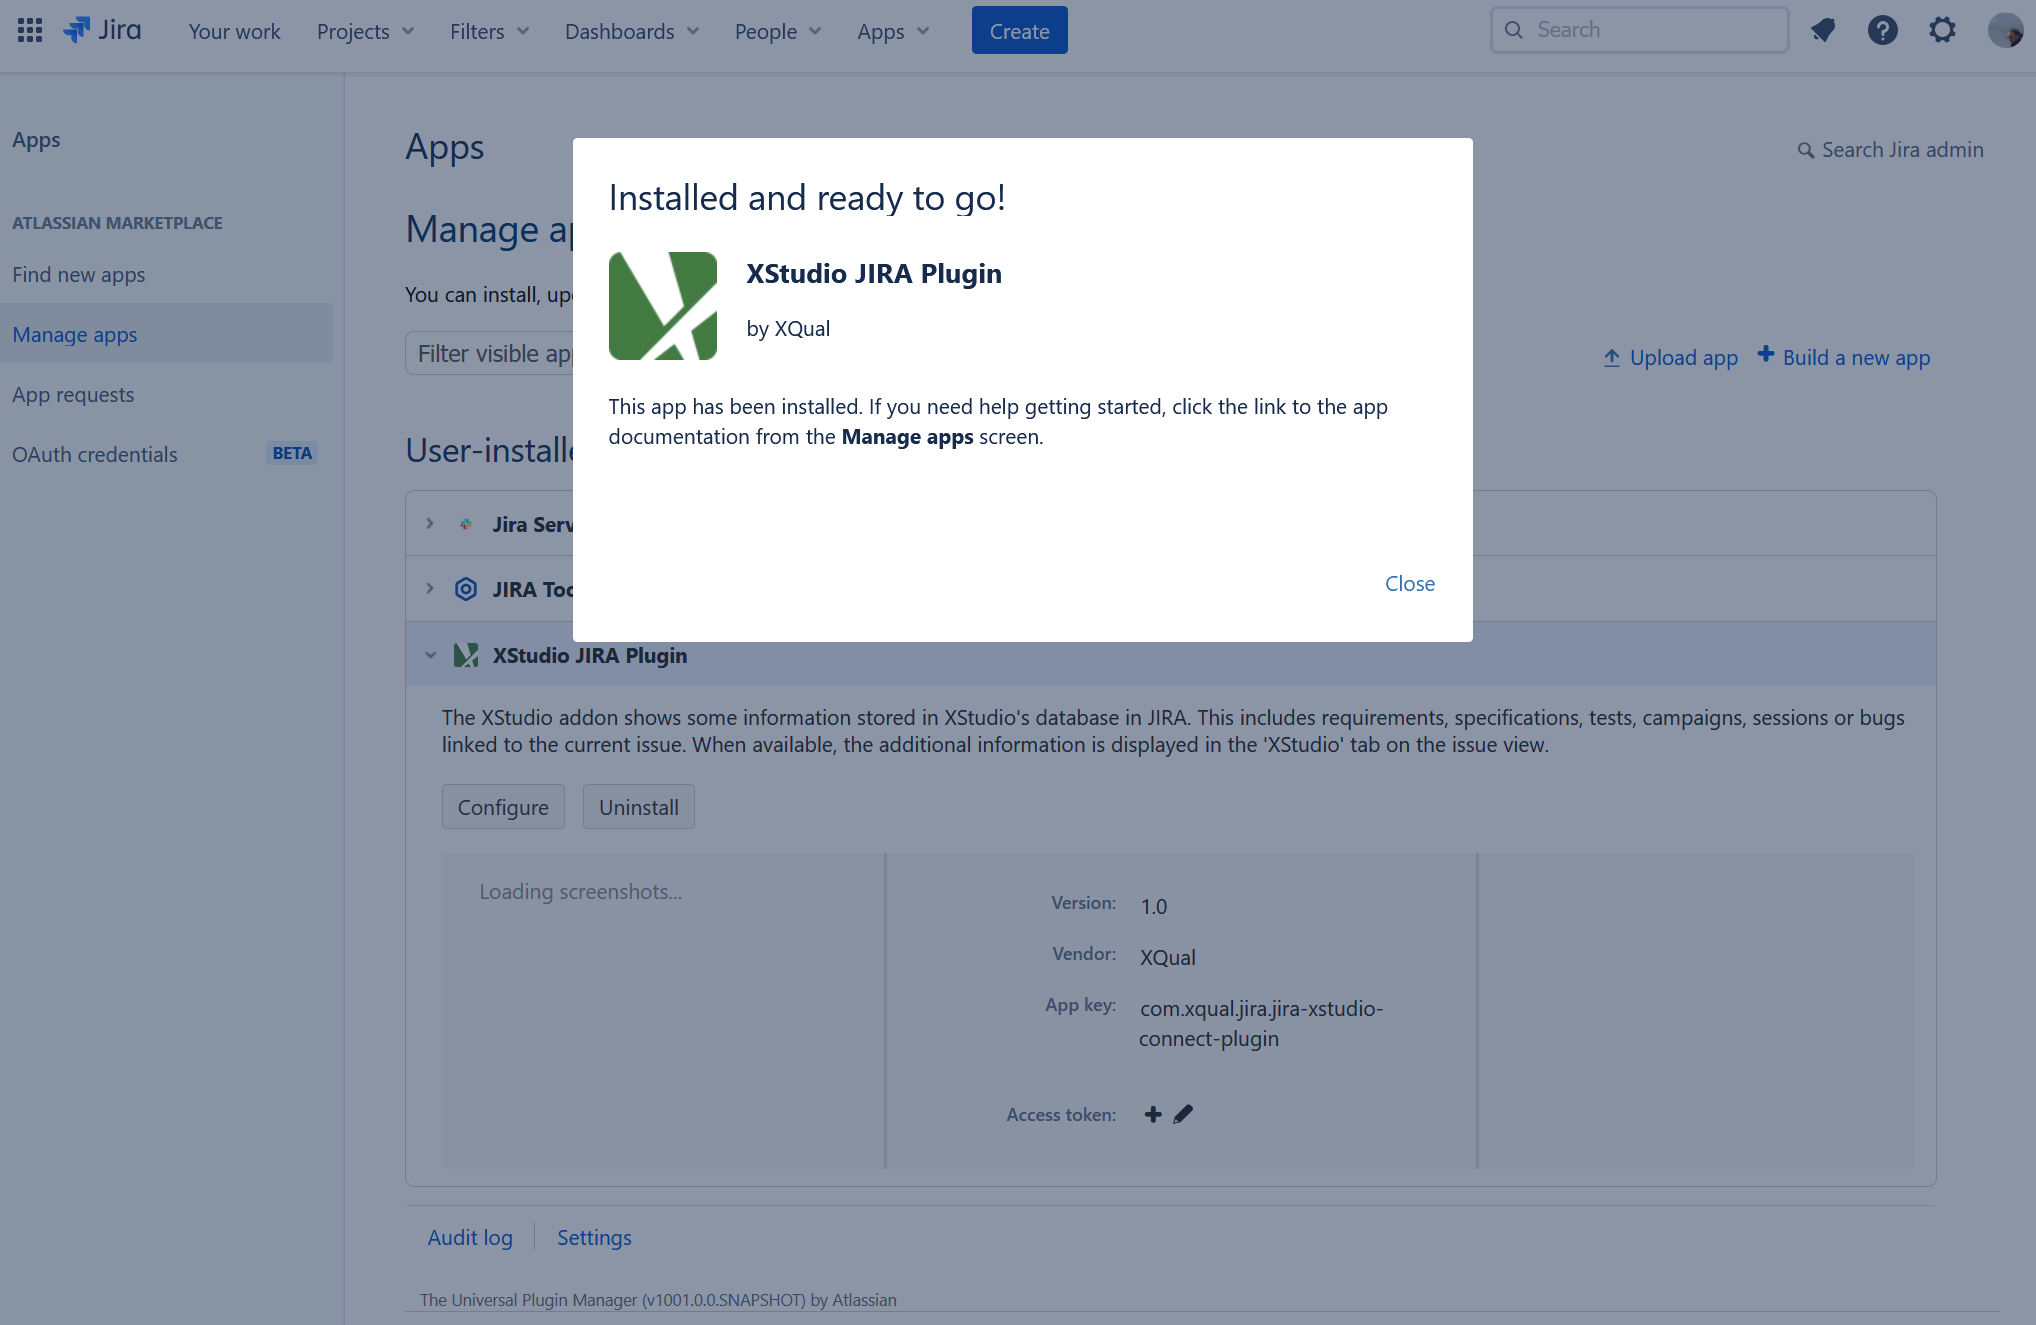
- Click on Configure
The configuration panel must be provided with the following information:
Field Description Requirement Mapping Which issue types in Jira are considered as requirements in XQual.
For instance,New Feature,ImprovementandEpicBug Mapping Which issue types in Jira are considered as bugs in XQual.
For instance,BugXQual Base-URL The URL of the XQual's Jira app front-end.
If you're using XQual on premises:
https://<your xstudio domain>/xqual/plugins/jira
More specifically, if you're using XQual Cloud:
https://<company-name>-prod1.myxqual.com/xqual/plugins/jiraUsername the username used to fetch data from the XQual (this account must exists in XQual) Password The password corresponding to the username above Show inline If ticked, all the data will be displayed embedded in Jira's interface (for security reasons, it requires a XQual https URL though).
If not ticked, a separate page is opened in the browser
Install from Atlassian Marketplace our Jira Legacy app
XQual's Jira Legacy app is available directly in the Atlassian Marketplace: XQual Jira Integration.Atlassian also provides an Installation section.
- Log into your Jira instance as an admin
- Open the Apps menu and select Manage your apps
- Click Find new apps from the left-hand side of the page
- Search for "XQual"
- Select XQual Jira Integration and click Get app
- Confirm the installation by clicking on Get it now
- After a few seconds, the XQual Jira integration app is confirmed to be installed
- Click Manage apps from the left-hand side of the page and select XQual Jira integration
- Click on Configure
The configuration panel must be provided with the following information:
Field Description Requirement Mapping Which issue types in Jira are considered as requirements in XQual.
For instance,New Feature,ImprovementandEpicBug Mapping Which issue types in Jira are considered as bugs in XQual.
For instance,BugREST Base-URL The URL of the REST API of your XQual server.
If you're using XQual on premises:
https://<your xstudio domain>/xqual/api
More specifically, if you're using XQual Cloud:
https://<company-name>-prod1.myxqual.com/xqual/apiXQual Base-URL The URL of the XQual's Jira app front-end.
If you're using XQual on premises:
https://<your xstudio domain>/xqual/plugins/jira
More specifically, if you're using XQual Cloud:
https://<company-name>-prod1.myxqual.com/xqual/plugins/jiraUsername the username used to fetch data from the XQual (this account must exists in XQual) Password The password corresponding to the username above Show inline If ticked, all the data will be displayed embedded in Jira's interface (for security reasons, it requires a XQual https URL though).
If not ticked, a separate page is opened in the browser
Install manually our Jira Legacy app
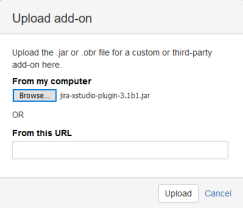
If you don't have access to the Atlassian Marketplace (i.e. no internet acces) you can also install manually our Jira Legacy app.- Log into your Jira instance as an admin
- Open the Apps menu and select Manage your apps
- Click on the Upload app link
- Provide the Jira Legacy app jar file
You can download the latest version here: Jira Legacy app v5
- After a few seconds, the XQual Jira integration app is confirmed to be installed
- Click Manage apps from the left-hand side of the page and select XQual Jira integration
- Click on Configure
The configuration panel must be provided with the following information:
Field Description Requirement Mapping Which issue types in Jira are considered as requirements in XQual.
For instance,New Feature,ImprovementandEpicBug Mapping Which issue types in Jira are considered as bugs in XQual.
For instance,BugREST Base-URL The URL of the REST API of your XQual server.
If you're using XQual on premises:
https://<your xstudio domain>/xqual/api
More specifically, if you're using XQual Cloud:
https://<company-name>-prod1.myxqual.com/xqual/apiXQual Base-URL The URL of the XQual's Jira app front-end.
If you're using XQual on premises:
https://<your xstudio domain>/xqual/plugins/jira
More specifically, if you're using XQual Cloud:
https://<company-name>-prod1.myxqual.com/xqual/plugins/jiraUsername the username used to fetch data from the XQual (this account must exists in XQual) Password The password corresponding to the username above Show inline If ticked, all the data will be displayed embedded in Jira's interface (for security reasons, it requires a XQual https URL though).
If not ticked, a separate page is opened in the browser
SSL/TLS connections
If you need to connect to a third-party bug-tracking server that uses SSL/TLS, you can provide the server certificate in the settings so that the connection can be established automatically.For more details, please refer to the secure connections section of the documentation.