

The tests
Here is a typical test tree. It immediately shows a number of useful pieces of information:- the total number of tests and testcases
- the number of tests and testcases in each category
- the number of tests and testcases in each folder

This screen is a bit different from the others since the left panel includes 2 separate areas:
- the usual tree including all the tests that we have on the system
- a sub-tree on the bottom that will list the testcases corresponding to the currently selected test
Tests and testcases are obviously what is the most important in the Data Model definition. The normal process is to start from specifications and make as many tests and testcases as necessary to check that specifications are all properly functioning.
Searching
For more details, please refer to the Searching objects chapter.Importing data
If you are migrating from manual test management - using for instance a basic spreadsheet application - or another test management system to XStudio you may want to import all your tests and test cases from Excel, CSV (semi-column ';' delimited) or XML.For more details, please refer to the thoroughly Import data tutorial.
Test vs test case
XStudio includes 2 notions: Test and Test case so it's important to well understand what it means to design properly your test plans.
A test is a group of ordered test cases.
A test case is a parameterized variant of a unique scenario
Generally, a test is gathering several test cases based on the same or similar sequence of operations and verifications.
Only the parameters differ.
That said, nothing prevents from having heterogenous test cases in the same test if you think it makes sense to group them that way. The only thing to remember is that those test cases will be executed all together as the user will request the execution of the test (not the individual test cases). Anyway, all the quality metrics are provided a test, test case and even step levels.
- This is at test level that you'll be able to set some dependencies with other tests
- This is at test level that you can set some custom attributs (i.e. non-regression, stress etc.). Those will be very handy to build automatically your campaign later on
- A Test campaign is composed of tests, not test cases. In other words, you will not be able to create a campaign and choose only some specific test cases within the same test
A test case is a parameterized variant of a unique scenario
Generally, a test is gathering several test cases based on the same or similar sequence of operations and verifications.
Only the parameters differ.
That said, nothing prevents from having heterogenous test cases in the same test if you think it makes sense to group them that way. The only thing to remember is that those test cases will be executed all together as the user will request the execution of the test (not the individual test cases). Anyway, all the quality metrics are provided a test, test case and even step levels.
The root node
Tabs
Traceability Matrix
One of the major interests in using test management tool is the ability to trace what is covered and what is notSpecifications
To get the global tests-specifications traceability matrix (if the specifications are enabled in the settings):- switch to the Tests module on the side bar
- select the root folder in the tree
- on the right panel, select the Traceability Matrix tab
- select the Specifications sub-tab
- the test tree appears including in the right column, all the specifications covered by each test.

Requirements
To get the global tests-requirements traceability matrix (if the specifications are disabled in the settings):- switch to the Tests module on the side bar
- select the root folder in the tree
- on the right panel, select the Traceability Matrix tab
- select the Requirements sub-tab
- the test tree appears including in the right column, all the requirements covered by each test.

Bugs
To get the global tests-bugs traceability matrix:- switch to the Tests module on the side bar
- select the root folder in the tree
- on the right panel, select the Traceability Matrix tab
- select the Bugs sub-tab
- the test tree appears including in the right column, all the bugs linked to each test.

Coverage
The Coverage tab will display the coverage details of the root folder in terms of SUTs, specifications (if enabled) and requirements.In addition, some advises are given to improve the coverage of the root folder:


Results
The Results tab will display the results details of the tests root folder in terms of tests, test cases, steps, per session, per configuration, per agent and per operator.To get tests root folder results:
- switch to the Tests module on the side bar
- in the tree, select the root folder
- on the right panel, select the results tab
- height tabs progress, tests, test cases, steps, per session, per configuration, per agent, per operator are displayed. Each shows some useful pieces of information:
Progress
To get progress tests results in the interval of dates:- switch to the Tests module on the side bar
- select the root folder in the tree
- on the right panel, select the Results tab
- select the Progress tab
- set the start date and end date and the SUT
- for tests, select the Tests tab to display the progress of the tests
- for tests cases, select the Tests cases tab to display the progress of the tests cases


Also, we can restrict the graphs to the results obtained on one SUT by selecting it on the SUT drop-down list.

Tests
To get tests results:- switch to the Tests module on the side bar
- select the root folder in the tree
- on the right panel, select the Results tab
- select the Tests tab to display the results of the tests

In the Tests tab, we can reorder the columns, resize them, sort on the columns content, add some optional columns, create some filters and export the table to Excel.
For more details, refer to the SUT toolbar results chapter.
Test cases
To get test cases results:- switch to the Tests module on the side bar
- select the root folder in the tree
- on the right panel, select the Results tab
- select the Test cases tab to display the results of the test cases

In the Test cases tab, we can reorder the columns, resize them, sort on the columns content, add some optional columns, create some filters and export the table to Excel.
For more details, refer to the SUT toolbar results chapter.
Steps
To get steps results:- switch to the Tests module on the side bar
- select the root folder in the tree
- on the right panel, select the Results tab
- select the Steps tab to display the results of the steps.

In the Steps tab, we can reorder the columns, resize them, sort on the columns content, add some optional columns and export the table to Excel.
For more details, refer to the SUT toolbar results chapter.
Per session
To get the per session results:- switch to the Tests module on the side bar
- select the root folder in the tree
- on the right panel, select the Results tab
- select the Per session tab to display the results per session.

Per configuration
To get per configuration results:- switch to the Tests module on the side bar
- select the root folder in the tree
- on the right panel, select the Results tab
- select the Per configuration tab to display the results per configuration.

Per agent
To get per agent results:- switch to the Tests module on the side bar
- select the root folder in the tree
- on the right panel, select the Results tab
- select the Per agent tab to display the results per agent.

Per operator
To get per operator results:- switch to the Tests module on the side bar
- select the root folder in the tree
- on the right panel, select the Results tab
- select the Per operator tab to display the results per operator.

Attributes
The attributes are "properties" you can set on tests.When you create some campaigns you can automatically import all the tests having certain attributes set using the filtering capabilities.

TIP: When an attribute is marked as dynamic it will be possible to overload its value for each test at execution time (set at the campaign session level).
The Attributes tab allows one to create, edit and delete attributes that may be used by any test.
Create attribute
Here is the process to create an attribute reusable for any test:- select the root folder in the test tree
- select the Attributes tab and click on the create attribute button

- enter the name, the type, if it's dynamic or not and optionally the normal values the attributes can take and submit

- the attribute immediately appears in the panel

Edit attribute
Here is the process to edit an attribute:- select the root folder in the test tree
- select the Attributes tab and select the attribute to be edited
- click on the edit attribute button

- change the name, the type, if it's dynamic or not and optionally the normal values the attributes can take and submit
- the attribute immediately appears in the panel with new values
Delete attribute
Here is the process to delete an attribute:- select the root folder in the test tree
- select the Attributes tab and select the attribute to be deleted
- click on the delete attribute button

- confirm and submit
- the attribute immediately disappears from the panel
Params
The params can be seen as "variables" you can use in your test cases.You can use params in the descriptions (or procedures) of your test cases by just typing the param name surrounded with
%Param values can be set either manually on each test case or generated automatically by one of the combination algorithms when creating a new test case template.

For instance, if you insert
%browser% in a test case description, it will be replaced at execution time with the value of the browser param set on this specific test case (i.e. Firefox).
TIP: It is possible to globally overload all the values of a specific param (on all the testcases) at execution time with a forced value (set at the campaign session level).
The Params tab allows one to create, edit and delete params that may be used by any test case.
Create param
Here is the process to create a param reusable for any testcase:- select the root folder in the test tree
- select the Params tab and click on the create param button

- enter the name, the type, the normal values for this param, optionally some invalid values and submit

- the param will immediately appears in the panel

Edit param
Here is the process to edit a param:- select the root folder in the test tree
- select the Params tab and select the param to be edited
- click on the edit param button

- change the name, the type, the normal values for this param, optionally some invalid values and submit
- the param immediately appears in the panel with new values
Delete param
Here is the process to delete a param:- select the root folder in the test tree
- select the Params tab and select the param to be deleted
- click on the delete param button

- confirm and submit
- the param immediately disappears from the panel
Statistics
The Statistics tab will display some metrics based on all the tests and test cases in the tree:- A priority breakout bar chart showing how many tests exist for each priority
- A number of test cases breakout bar chart showing how many tests have how many test cases (in different ranges 0-5, 6-10, etc.)

Custom fields
You can customize the tests and the test cases by creating some new custom fields that will appear in their Details tab.Custom fields can have different types: text fields, drop-down menu, checkbox, formatted text field. They can also be marked as mandatory or not and are positionned at the index you specify.
The Custom fields tab includes tco sections (one for the tests and one for the test cases) allowing to create, edit and delete custom fields.

Create custom field
Here is the process to create a custom field for a test:- select the root folder in the tree
- on the right panel, click on the create custom field button

- enter the name, the type, the position, if it's mandatory or not and the default value of the custom field and submit

- the custom field will immediately appears in the panel
- the new custom field is added to all the tests assigned with its default value

Edit custom field
Here is the process to edit a custom field for a test:- in the tree, select a root folder
- on the right panel, select the custom field
- click on the edit custom field button

- change the name, the type, the position, if it's mandatory or not and/or the default value of the custom field and submit

- the custom field immediately appears in the panel with new values
- the custom field is updated on all the tests

Delete custom field
Here is the process to delete a custom field for a test:- select the root folder in the tree
- on the right panel, select the custom field
- click on the delete custom field button

- confirm and submit

- the custom field immediately disappears from the panel
- the custom field is removed from all the specifications

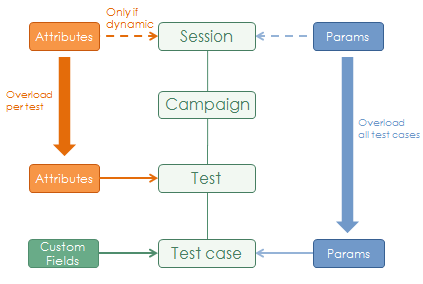
Here is a schema that sum-up the differences among attributes, params and custom fields:
Toolbar
Create a category
This first thing to do is to create a category. To do this:- in the tree, select the root folder
- on the right panel, click on the create category button

- a dialog box is displayed

- enter the name of the category.
- enter the description of the category. You can use the formatting tools (wiki-style) to format the text.
- choose a launcher to be associated with that category: tree_step_manual.jar (one of the 5 different interfaces for manual testing) indicates that all the tests included under that category will be executed using the tabular manual test launcher.
- click on submit
- the category immediately appears in the tree

Create a report
It may be interesting to export or to print a global report on all the tests you have.For more details, refer to the Tests report chapter.
The category nodes
Tabs
Details
The category details tab allows one to specify the name, the descripton of the category and the type of Laucher.For manual testing, there is four different Manual lauchers:
- Manual
- Simple manual
- Tabular manual
- Tabular step manual

Coverage
The Coverage tab will display the coverage details of the selected category in terms of SUTs, requirements and specifications (if enabled).To get tests category coverage metrics:
- switch to the Test module on the side bar
- in the tree, select the category
- on the right panel, select the Coverage tab
- three tabs SUTs, Specifications and Requirements are displayed. Each shows some useful pieces of information such as:
- percentage of the coverage
- for the SUTs, the list of fully covered, partially covered and not covered by the tests category.
- for the specifications, the list of fully covered, partially covered and not covered by the tests category.
- for the requirements, the list of fully covered, partially covered and not covered by the tests category.


Results
The Results tab will display the results details of the selected category in terms of tests, test cases and steps.To get category results:
- switch to the Tests module on the side bar
- in the tree, select the category
- on the right panel, select the results tab
- four tabs progress, tests, test cases, steps are displayed. Each shows some useful pieces of information:
Progress
To get progress category results in the interval of dates:- switch to the Tests module on the side bar
- select the category in the tree
- on the right panel, select the Results tab
- select the Progress tab
- set the start date and end date and the SUT
- for tests, select the Tests tab to display the progress of the tests
- for tests cases, select the Tests cases tab to display the progress of the tests cases


Also, we can restrict the graphs to the results obtained on one SUT by selecting it on the SUT drop-down list.

Tests
To get tests results:- switch to the Tests module on the side bar
- select the category in the tree
- on the right panel, select the Results tab
- select the Tests tab to display the results of the tests

In the Tests tab, we can reorder the columns, resize them, sort on the columns content, add some optional columns, create some filters and export the table to Excel.
For more details, refer to the SUT toolbar results chapter.
Test cases
To get test cases results:- switch to the Tests module on the side bar
- select the category in the tree
- on the right panel, select the Results tab
- select the Test cases tab to display the results of the test cases

In the Test cases tab, we can reorder the columns, resize them, sort on the columns content, add some optional columns, create some filters and export the table to Excel.
For more details, refer to the SUT toolbar results chapter.
Steps
To get steps results:- switch to the Tests module on the side bar
- select the category in the tree
- on the right panel, select the Results tab
- select the Steps tab to display the results of the steps.

In the Steps tab, we can reorder the columns, resize them, sort on the columns content, add some optional columns and export the table to Excel.
For more details, refer to the SUT toolbar results chapter.
Design
To get category design:- switch to the Tree module on the side bar
- in the tree, select a category
- on the right panel, select the Design tab
- for tests, select the Tests tab
- for test case, select the Test cases tab


Series of graph are displaying on the panel for a given interval of date:
- For tests:
- the evolution of the number of tests authored
- the evolution of the percentage of tests authored
- the evolution of the number of tests developed
- the evolution of the percentage of tests developed
- For Test cases:
- the evolution of the number of test cases authored
- the evolution of the percentage of test cases authored
- the evolution of the number of test cases developed
- the evolution of the percentage of test cases developed
Statistics
The Statistics tab will display some metrics based on all the tests and test cases included in the current category and its child folders:- A priority breakout bar chart showing how many tests exist for each priority
- A number of test cases breakout bar chart showing how many tests have how many test cases (in different ranges 0-5, 6-10, etc.)

Attachments
For more details, refer to the Attachment chapter.Toolbar
Delete a category
You can delete a category by just clicking this button
WARNING: deleting a category will delete all objects linked to this category (i.e. underlying folders, tests, test results, statistics).
Scan/search for physical tests
If you already executed some tests that exist within this category, this tool can try to search local physical tests and automatically import them.It's not always possible so is really depending on the launcher.
Here is the process scan local tests:
- select a category node in the tree
- on the right panel, click on the scan/search local tests button

- select a configuration that you could use on this computer to run the already existing tests:

- press the Run button
- the scan occurs and a list of potential tests (not already existing in XStudio) appears in a table:

- review the list and select which tests you want to import and submit
- the select tests are automatically imported and are immediatly available in teh test tree


Create a folder
A folder can be created only under a category node or another folder node.Here is the process to create a new folder:
- select a category node in the tree
- on the right panel, click on the create folder button

- enter the name of the folder and submit
- the folder immediately appears in the tree
Create a report
It may be interesting to export or to print a report on all the tests belonging to a category.For more details, refer to the Tests report chapter.
The folder nodes
Tabs
Details
The folder details tab allows one to specify the name and the description of the folder
Coverage
The Coverage tab will display the coverage details of the selected folder in terms of SUTs, requirements and specifications (if enabled).In addition, some advises are given to improve the coverage of the folder:
To get folder coverage metrics:
- switch to the Tests module on the side bar
- in the tree, select the folder
- on the right panel, select the Coverage tab
- three tabs SUTs, Specifications and Requirements are displayed. Each shows some useful pieces of information such as:
- percentage of the coverage
- for the SUTs, the list of fully covered, partially covered and not covered by the test folder.
- for the specifications, the list of fully covered, partially covered and not covered by the test folder.
- for the requirements, the list of fully covered, partially covered and not covered by the test folder.


Results
The Results tab will display the results details of the selected folder in terms of tests, test cases and steps.To get folder results:
- switch to the Tests module on the side bar
- in the tree, select the folder
- on the right panel, select the results tab
- four tabs progress, tests, test cases, steps are displayed. Each shows some useful pieces of information:
Progress
To get progress folder results in the interval of dates:- switch to the Tests module on the side bar
- select the folder in the tree
- on the right panel, select the Results tab
- select the Progress tab
- set the start date and end date and the SUT
- for tests, select the Tests tab to display the progress of the tests
- for tests cases, select the Tests cases tab to display the progress of the tests cases


Also, we can restrict the graphs to the results obtained on one SUT by selecting it on the SUT drop-down list.

Tests
To get tests results:- switch to the Tests module on the side bar
- select the folder in the tree
- on the right panel, select the Results tab
- select the Tests tab to display the results of the tests

In the Tests tab, we can reorder the columns, resize them, sort on the columns content, add some optional columns, create some filters and export the table to Excel.
For more details, refer to the SUT toolbar results chapter.
Test cases
To get test cases results:- switch to the Tests module on the side bar
- select the folder in the tree
- on the right panel, select the Results tab
- select the Test cases tab to display the results of the test cases

In the Test cases tab, we can reorder the columns, resize them, sort on the columns content, add some optional columns, create some filters and export the table to Excel.
For more details, refer to the SUT toolbar results chapter.
Steps
To get steps results:- switch to the Tests module on the side bar
- select the folder in the tree
- on the right panel, select the Results tab
- select the Steps tab to display the results of the steps.

In the Steps tab, we can reorder the columns, resize them, sort on the columns content, add some optional columns and export the table to Excel.
For more details, refer to the SUT toolbar results chapter.
Statistics
The Statistics tab will display some metrics based on all the tests and test cases included in the current folder and its childs:- A priority breakout bar chart showing how many tests exist for each priority
- A number of test cases breakout bar chart showing how many tests have how many test cases (in different ranges 0-5, 6-10, etc.)

Attachments
For more details, refer to the Attachment chapter.Toolbar
Create a folder
A folder can be created only under the root folder node or another folder node.Here is the process to create a new folder:
- select a folder node in the tree
- on the right panel, click on the create folder button
- enter the name of the folder and submit
- the folder immediately appears in the tree
Delete a folder
You can delete a folder by just clicking this button
WARNING: deleting a folder will delete all objects linked to this folder (i.e. underlying folders, tests, test results, statistics).
Empty a folder
You can empty a folder by just clicking this button
WARNING: emptying a folder will delete all objects linked to its childs (i.e. underlying folders, tests, test results, statistics).
Copy a folder
You can copy a folder by just clicking this buttonNote that the copy process will recursively copy also all the inner items (including their links).
Move a folder
You can move a folder by just clicking this buttonCreate a test
To create a test:- in the tree, select a folder (create one if necessary)
- on the right panel, click on the create test button

- a dialog box including five tabs is displayed


- fill in the Details tab with the name and priority of the test (leave the canonical path blank).
- fill the Scope tab with the prerequisites and the general description of the test. You can use the formatting tools (wiki-style) to format the text.
- Pick one user in the Author tab that will be registered as the author of the test
- (Opt.) Pick one user in the Developer tab that will be registered as the developer of the test (relevant only if this is an automated test)
- (Opt.) Pick assets in the Assets tab that will be registered as the assets of the test and select the Conditions to make this test executable from drop-down list
NOTE about the Assets rules:
Here are the available rules that will determine if the test is executable in regards to assets linked to it and assets available in the session that contains the test.
Conditions to make a test executable:
- Always executable
- At least one of the test's assets is available in the session
- All the test's assets are available in the session
- At least one of the session's assets is available in the test
- All the session's assets are available in the test
Example:
- Always executable
Test Session Test executed * * Y
- At least one of the test's assets is available in the session
Test Session Test executed A,B,C - N A,B,C A,D,E Y A,B,C B,D,E Y A,B,C D,F,F N - * Y
- All the test's assets are available in the session
Test Session Test executed A,B,C - N A,B,C A,B,C,D Y A,B,C A,B,D,E N - * Y
- All the session's assets are available in the test
Test Session Test executed A,B,C - Y A,B,C A,B,D N A,B,C A,B Y A,B,C A,B,C Y - A N
- click on submit
- the test immediately appears in tree


Create a report
It may be interesting to export or to print a report on all the tests under a specific folder.For more details, refer to the Tests report chapter.
The tests nodes
Tabs
Details
The tests Details tab allows one to specify the name, the priority, the canonical path(opt), the additional infos and the related URL and to see the average duration based on previous executions.If some custom fields have been configured, they will appear here as well (positionned as specified).

Scope
The tests Scope tab allows one to specify the prerequisites and the description.Results
The Results tab will display the results details of the selected test in terms of test cases and steps.To get tests results:
- switch to the Tests module on the side bar
- in the tree, select the test
- on the right panel, select the results tab
- three tabs history, test cases and steps are displayed. Each shows some useful pieces of information:
History
One very interesting option is also to check the history of all the executions of one specific test. To do so, it is extremely simple:- switch to the Tests module on the side bar
- select the test in the tree
- on the right panel, select the Results tab
- select the History tab to display the historic results of the test

The panel shows a number of useful pieces of information:
- the campaign sessions that were already executed and that included that test
- the start and stop date of this campaign session
- the result of this test in the campaign session
Test cases
To get test cases results:- switch to the Tests module on the side bar
- select the test in the tree
- on the right panel, select the Results tab
- select the Test cases tab to display the results of the test cases

Steps
To get steps results:- switch to the Tests module on the side bar
- select the test in the tree
- on the right panel, select the Results tab
- select the Steps tab to display the results of the steps.

Toolbar
In the Tests/Test cases/Steps tabs, we can reorder the columns, resize them, sort on the columns content, add some optional columns, create some filters and export the table to Excel.For more details, refer to the SUT toolbar results chapter.
Author
The tests Author tab allows one to specify the author. It's also is used to assign the tasks in the DashboardDeveloper
The tests Author tab allows one to specify the developer. It's also is used to assign the tasks in the DashboardDependencies
It is possible to add dependencies between tests. One test can be the parent of one or several tests. The reverse is also true.Ultimately, XStudio will be able to use this information to:
- execute only child tests if the parents are all successful (there are several rules available similar)
- compute automatically the order of execution of the tests
To create some dependencies between tests:
- in the tree, select a test
- on the right panel, select the Dependencies tab
- select the Child of (or Father of) tab
- un-toggle the select filter button
 to display the complete test tree
 - check all the tests that are childs of (or fathers of) the current test
- (opt.) re-toggle the select filter button
 to display only the selected requirement
 - click on submit

- Click on full graph of dependencies button

- Dependencies graph display

In this example, Additions will be child of Division and Multiplication.
Attributes
- Associate some attributes to a test
- Create and associate a new attribute to a test
- Edit an attribute
There are two types of attributes: static and dynamic. Dynamic attributes are identified with the
Associate some attributes to a test
To associate attributes to a test:- in the tree, select a test
- on the right panel, select the Attributes tab
- un-toggle the select filter button to display the complete attributes list
- check the attributes that need to be associated to the current test.
- give a value to each of these attributes. Depending of the type of the attribute the value field will be different:
 Boolean: a check box
 Integer: a text field accepting a combination of numbers, range of numbers, list of numbers.
- you can use the character ':' to define a range of numbers (i.e. '
10:15' will define all numbers included in between 10 and 15. This is equivalent to '10;11;12;13;14;15' - you can also use the character ';' as a delimiter of several numbers
- both can be combined (i.e. you can use strings like '
-4;34:56;-2:-1;67:68'
- you can use the character ':' to define a range of numbers (i.e. '
 String: a text field accepting a string or a list of strings.
- you can use the character ';' as a delimiter of several strings (i.e. '
foo bar;john doe;jane doe')
- you can use the character ';' as a delimiter of several strings (i.e. '
- (opt.) re-toggle the select filter button to display only the selected attributes
- click on Submit

Create and associate a new attribute to a test
To create a new (not already existing) attribute and associate it to a test:- in the tree, select a test
- on the right panel, select the Attributes tab
- un-toggle the select filter button to display the complete attributes list
- click on the create attribute button
- a dialog box is displayed
- enter the name of the attribute
- choose the type for this attribute
- Select the checkbox dynamic if you this attribute to be over-writeable at campaign session creation time

- click on Submit
- the attribute immediately appears in the tree
- check this attribute
- give a value to this attribute

- (opt.) re-toggle the select filter button to display only the selected attributes
- click on Submit


Edit an attribute
To rename an attribute or change its 'dynamic' property:- in the tree, select a test
- on the right panel, select the Attributes tab
- un-toggle the select filter button to display the complete attributes list
- select the attribute you want to edit
- click on the edit attribute button
- a dialog box is displayed
- enter the new name of the attribute, change the type of the attribute or select/deselect the dynamic property (note that if you change the type of the attribute, all the former associations with some tests will be deleted)

- click on Submit
- the modified attribute immediately appears in the tree

Create a campaign based on attribute filter
When you have a lot of tests, it may be interesting to preselect all tests having certain attribute values when you create a campaign.More details are available in the documentation about how to create a campaign based on attribute filter.
Coverage
The Coverage tab will display the coverage details of the selected test in terms of SUT, requirements and specifications (if activated).In addition, some advises are given to improve the coverage of the test:


To modify the list of specifications linked to the current test, just un-toggle the tree filter
If the Specification module is not activated in the server settings, you'll not be able to select specifications. Instead, you'll be able to select directly some requirements.
To modify the list of requirements linked to the current test, just un-toggle the tree filter
TIP: If you have to select hundreds of requirements this task can be painful and error prone though.
Hopefully, the filtering toolbar at the top of the tree can help you selecting more intelligently the requirements.
For more details, refer to the Filtering chapter.
Hopefully, the filtering toolbar at the top of the tree can help you selecting more intelligently the requirements.
For more details, refer to the Filtering chapter.
Bugs
This tab shows all the bugs that have been found on the selected test.Bugs have been found through a failed test and link to this test execution.

Assets
This tab shows all the assets that have been linked on the selected test.
Attachments
For more details, refer to the Attachment chapter.Revisions (versioning)
This tab shows all the revisions of the selected test.You can open a specific revision of the test by selecting a revision in the list and clicking on the open button

Changes (audit log)
XStudio allows tracking any changes on a particular object.To check the history of a test:
- select the test in the tree
- open the Changes tab on the right panel
- the panel shows a table gathering all the dated changes.
On a test you will get a panel similar to this one:
TIP: You can directly edit a user's details by clicking on his/her name in the changes table.
Toolbar
Delete a test
You can delete a test by just clicking this button
WARNING: deleting a test will delete all objects linked to this test (i.e. tests case)
Copy a test
You can copy a test by just clicking this buttonThe copy process will copy also the links in between the selected test and its requirements or specifications.
Move a test
You can move a test by just clicking this buttonCreate a testcase
We already mentioned that, for instance, a test could verify a specific function of an API. But there are a lot of things to check to validate one single function. For instance, you may want to test all combination of parameters and check that the result is correct.One testcase must be able to check one specific function in some particular conditions. The sum of all the testcases makes one test.
To have a test succeeding, all the testcase must succeed:
- if all testcases are successful then test is successful
- if one testcase is failed then test is failed
- In all other cases, test is set with status unknown
To create a testcase:
- in the tree, select a test
- on the right panel, click on the create testcase button

- a dialog box including three tabs is displayed


- fill in the Details tab with the index (defining the order in which the testcases will be executed within a test), name and general description of the testcase. You can use the formatting tools (wiki-style) to format the text. Do not forget to check the Authored and Developed checkboxes. A manual test MUST be authored to be executed. Not yet authored manual tests are skipped when running a campaign. An automated test MUST be developed to be executed. Not yet developed automated tests are NOT executed when running a campaign.
- select the Procedure tab and define all the steps and checks that will be needed in this testcase.
- add a step:
- in the tree, select the root folder
- click on the create step button

- enter the description of the step and submit
- add parameters (opt.):
- in the tree, select the parameters node
- click on the create parameters button
- enter the description of the parameter and submit
- repeat the operation if you need to specify more parameters
- add checks (opt.):
- in the tree, select the checks node
- click on one of the create boolean operators button


- click on the new operator and click on the create check button

- enter the description of the check and submit
- repeat the operation if you need to specify more checks (you can mix as many different boolean operators as you want)
- repeat the operation for every step and submit
- add a step:
- select the Params tab and select None or create parameters (opt.). You can also get more information on how to create or use parameter'
- click on submit
- the testcase immediately appears in the sub-tree on the left panel


Depending on the settings, you can use either a Grid view or a Tree view (for more details, see settings chapter).
For Grid view, hrere the corresponding screen:

Note: in the title, param names can be used
Generate testcases from combination of parameters
You can create many test cases by generating them from combination of parameters. To do so:- in the tree, select a test
- on the right panel, click on the create testcase button
- a dialog box including three tabs is displayed
- fill in the Details tab with the name and general description of the testcase.
- In the name field, take the test case name as follow with parameters: All XQual basic menus on %os%
- In the description field, set the description as follow with parameters: Test a %social% button in the social bar on %os%

- select the Procedure tab and define all the steps with parameters as follow:

- select the Params tab, to create or select existant parameters
- select checkbox Generate
- select Algorithm method: Pairwise combinations or All combinations:
- All combinations: every combinations will be generated.
- Pairwise combination: All-pairs testing or pairwise testing is a combinatorial software testing method that, for each pair of input parameters to a system
(typically, a software algorithm), tests all possible discrete combinations of those parameters. Using carefully chosen test vectors, this can be done much
faster than an exhaustive search of all combinations of all parameters, by "parallelizing" the tests of parameter pairs. The number of tests is typically O(nm),
where n and m are the number of possibilities for each of the two parameters with the most choices.
The reasoning behind all-pairs testing is this: the simplest bugs in a program are generally triggered by a single input parameter. The next simplest category of bugs consists of those dependent on interactions between pairs of parameters, which can be caught with all-pairs testing.[1] Bugs involving interactions between three or more parameters are progressively less common,[2] while at the same time being progressively more expensive to find by exhaustive testing, which has as its limit the exhaustive testing of all possible inputs.
- select Input values to use, in the drop-down list: Only normal values
- click on the create param button
- a dialog box is displayed
- enter the name of the parameter: os
- choose the type for this parameter: string
- enter the normal values: Windows NT;Windows 2000;Windows XP;Windows Vista;Windows 7;Linux Redhat;Linux Ubuntu;Linux BSD;MacOSX;Solaris
- enter the invalid values (not mandatory)
- click on Submit
- the parameter os immediately appears in the tree
- enable this parameter
- un-toggle the select filter button to display the complete parameters list If it is not the case
- repeat these actions for the following parameters: browser, url, menu, social

- Click on Preview button
 to preview all the possible pairwise combinations of test case

- click on Exit
- click on Submit
- a list of test cases is immediately generated in the test case tree corresponding to pairwise testing


WARNING: the description of all the test cases generated still include only the placeholders (i.e. %browser%)
because we may want to modify the testcase template so that the changes are appearing in all the test cases that have been generated at the same time.
The placeholders will be replaced only at execution time by their respective values (that you can see in the Params tab).
Generate testcases from Direct edit
- in the tree, select a test
- on the right panel, click on the create testcase button
- a dialog box including three tabs is displayed
- fill in the Details tab with the name and general description of the testcase.
- In the name field, take the test case name as follow with parameters: Addition %c%+%d%
- In the description field, set the description as follow with parameters: Test addition numbers: %c%+%d%

- select the Procedure tab and define all the steps with parameters as follow:

- select the Params tab, to create or select existant parameters
- select checkbox Import from CSV/Edit
- set the parameters in the raw data field as follow:
c;d
1;2
4;25
99;14

- Click on Preview button to preview all the pair of test case

- click on Exit
- click on Submit
- a list of test cases is immediately generated in the test case tree corresponding the combinaison of parameters


Generate testcases from prameters in excel
To generate test case by importing parameters from.csv file, you must create these one in excel file.See below the format of the dataset to import:
Col1Name;Col2Name;...;ColNName
Value11;Value12;...;Value1N
Value21;Value22;...;Value2N
...;...;...;...
ValueM1;ValueM2;...;ValueMN
- in the tree, select a test
- on the right panel, click on the create testcase button
- a dialog box including three tabs is displayed
- fill in the Details tab with the name and general description of the testcase.
- In the name field, take the test case name as follow with parameters: Addition %c%+%d%
- In the description field, set the procedure as follow with parameters: Test addition numbers: %c%+%d%
- select the Procedure tab and define all the steps with parameters as follow:
- select the Params tab, to create or select existant parameters
- select checkbox Import from CSV/Edit
- click on Open button

- the download window is displayed
- select the cvs file containing the parameters and click on Open

- parameters are imported in the Raw data field as if you had edited them manually there
- Click on Preview button to preview all the combinations


- click on Exit
- click on Submit
- a list of test cases is immediately generated in the test case tree corresponding the combinaison of parameters


Edition of generated test cases
- select the test case to be edited: Addition %a%+%b%
- Change name of test case as follow:
Multiplication %a%*%b% - Change the description of test case as follow:
Open the calculator
Click on %a%
Click on *
Click on %b%
Click on =
Check on the screen that the result is correct - click on Submit
- all the name and description of test case are immediately updated
Create a reusable testcase
To create a reusable testcase:- in the tree, select a test
- on the right panel, click on the create testcase linked to a reusable testcase button

- a dialog box including two tabs is displayed


- click on the Reusable test case to select the reusable objects
- select the Params tab, to create or select existant parameters
- click on Submit
- the reusable testcase immediately appears in the sub-tree on the left panel
- in the tree, select the test
- on the right panel, click on the start button
 to display the "Individual test execution" screen
 - you need to set at least the SUT and the Configuration
- click on Submit
- the Test campaign session details screen immediately appears and will display real time the results of testing

- If this test is belonging to a category associated with one of the manual launchers (in other words, if this is a manual test), an additional dialog box ("test procedure" screen) will appear:

- in the tree, select the test
- on the right panel, click on the start with a specific launcher button
 to display the "Individual test execution" screen
 - you need to set at least the SUT and the Configuration
- in this case, you'll have to choose first a launcher, to select the configuration of your choice:

- click on Submit
- the Test campaign session details screen immediately appears and the test will be executed with he launcher you explicitely selected
- in the tree, select a test
- in the sub-tree, select a testcase
- on the right panel (Procedure tab), select the node in the tree you wish to modify
- click on the edit node button

- apply the changes and submit
- in the tree, select a test and test case
- on the right panel, select the Params tab
- un-toggle the select filter button to display the complete parameters list
- click on the create param button
- a dialog box is displayed
- enter the name of the parameter
- choose the type for this parameter
- enter the normal values
- enter the invalid values (not mandatory)

- click on Submit
- the parameter immediately appears in the tree
- check this parameter
- give a value to this parameter

- (opt.) re-toggle the select filter button to display only the selected parameters
- click on Submit
- In the test case Details tab
- select the test case created with params a and b
- on the right panel, select the Details tab
- in the description field, enter the procedure as follow with parameters:
Open the calculator
Click on %operand1%
Click on +
Click on %operand2%
Click on =
Check on the screen that the result is correct

- In the test case procedure tab
- select the test case created with params operand1 and operand2
- on the right panel, select the Procedure tab
- select the root folder
- create a step as follow:
Step1: Open the calculator
Step2: Click on %operand1% (optionally add a parameter: number1=%a%)
Step3: Click on +
Step4: Click on %operand2% (optionally add a parameter: number3=%b%)
Step5: Click on =
Step6: Check on the screen that the result is correct

- in the tree, select a test and test case
- on the right panel, select the Params tab
- un-toggle the select filter button to display the complete paramaters list
- select the parameter you want to edit
- click on the edit param button
- a dialog box is displayed
- enter the new name of the parameter, change the type of the parameter or enter the new normal values.
- click on Submit
- the new modified parameter immediately appears in the tree
- in the tree, select a test and test case
- on the right panel, select the Params tab
- un-toggle the select filter button to display the complete paramaters list
- select the parameter you want to delete
- click on the delete param button
- a dialog box is displayed with confirmation message
- click on Submit
- the parameter immediately disappears in the tree
- switch to the Tests module on the side bar
- in the tree, select the test and the test case
- on the right panel, select the results tab
- two tabs history and steps are displayed. Each shows some useful pieces of information:
- switch to the Tests module on the side bar
- in the tree, select a test and testcase
- on the right panel, select the Results tab
- select the History tab to display the historic results of the test case
- the campaign sessions that were already executed and that included that test
- the start and stop date of this campaign session
- the result of this test case in the campaign session
- switch to the Tests module on the side bar
- in the tree, select the test and the test case
- on the right panel, select the Results tab
- select the Steps tab to display the results of the steps.
- select the test and testcase in the tree
- open the Changes tab on the right panel
- the panel shows a table gathering all the dated changes.


Run a test
Note: The tests are NOT supposed to be executed this way!
It's much better to organize your tests in campaigns and plan the execution of these campaigns in cycles. This way you'll be able to assign testers to specific campaign and schedule their execution. You can even integrate with your continuous integration system to optimize your test time and take advantage at 100% of your automated tests.
BUT sometime, you just need to run a specific test the quick-and-dirty way to just check the test procedure itself or the automated script. In other words, sometimes you don't need to really track the result but just try the test. What follows must be used only with these considerations in mind. If you really want to track your execution you should consider running a test campaign the standard way.
To run a test the quick and dirty way:


When you run a test this way, a temporary/fake campaign and sessions are created in the campaign tree's Manual folder.
Remember that this folder is aimed at being regularly cleaned up.
Remember that this folder is aimed at being regularly cleaned up.
NB: If the test cases are parameterized, all the parameters are replaced by their values during test execution.
The creation of parameters are handled in the Params and Root node params chapters.
The creation of parameters are handled in the Params and Root node params chapters.
Run a test with a specific launcher
As we've seen, if you start a test by clicking the start buttonIn some specific cases, you could prefer forcing using a different launcher.
For instance, if you have an automated test, you may find interesting to execute it manually sometimes.

The test cases nodes
Tabs
Details
The testcases Details tab allows one to specify the index, the name and the description
procedure
The creation of test procedure of a test case is handled in the Create a testcase chapter.To modify the test procedure of a test case:
Params
Create some parameters
To create some parameters for test case:

Use parameters
Parameters can be used either in the description or in the procedure detailed steps.

Edit a parameter
To rename a parameter, change a type or normal vakues:
Delete a parameter
To delete a parameter:Results
The Results tab will display the results details of the selected test in terms of test cases and steps.To get tests results:
History
One very interesting option is also to check the history of all the executions of one specific test case. To do so, it is extremely simple:
The panel shows a number of useful pieces of information:
Steps
To get steps results:
Toolbar
In the Steps tabs, we can reorder the columns, resize them, sort on the columns content, add some optional columns and export the table to Excel.For more details, refer to the SUT toolbar results chapter.
Attachments
For more details, refer to the Attachment chapter.Revisions (versioning)
This tab shows all the revisions of the selected testcase.You can open a specific revision of the testcase by selecting a revision in the list and clicking on the open button.

Changes (audit log)
XStudio allows tracking any changes on a particular object.To check the history of a testcase:
On a testcase you will get a panel similar to this one:
TIP: You can directly edit a user's details by clicking on his/her name in the changes table.
Toolbar
Create a testcase
For more details, refer to the create a testcase chapter.Create a reusable testcase
For more details, refer to the create a reusable testcase chapter.Delete a testcase
You can delete a testcase by just clicking this button
WARNING: deleting a testcase will delete all objects linked to this testcase (i.e. procedure)
Copy a testcase
You can copy a testcase by just clicking this buttonNote that you can copy a test case in the same test or in a different test.